 |
absggn00000358
DIAGNOSTIC ASSIST FUNCTION [AUDIO]
id0902f6804500
Structural View
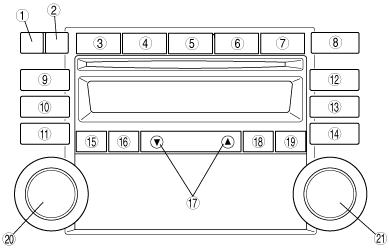
Button and switch location
absggn00000358
|
|
No. |
With RDS (radio data system) |
Without RDS (radio data system) |
|---|---|---|
|
1
|
CLOCK button
|
|
|
2
|
LOAD button
|
|
|
3
|
FM 1 button
|
|
|
4
|
FM 2 button
|
|
|
5
|
AM button
|
|
|
6
|
CD button
|
|
|
7
|
MEDIA button
|
|
|
8
|
EJECT button
|
|
|
9
|
Preset button 1
|
|
|
10
|
Preset button 2
|
|
|
11
|
Preset button 3
|
|
|
12
|
Preset button 4
|
|
|
13
|
Preset button 5
|
|
|
14
|
Preset button 6
|
|
|
15
|
DISP/AUTO-M button
|
|
|
16
|
PTY button
|
—
|
|
17
|
SEEK/APC/TRACK switch (up or down)
|
|
|
18
|
TA button
|
—
|
|
19
|
AF button
|
SCAN/TRAFFIC INFORMATION button
|
|
20
|
POWER/VOLUME button
|
AUDIO CONT/TUNE/TEXT button
|
|
21
|
AUDIO CONT/TUNE/TEXT button
|
POWER/VOLUME button
|
LCD Inspection
1. With the audio power on, press the POWER/VOLUME button and simultaneously press the SEEK/APC/TRACK switch (up) for approx. 1s.
2. Inspect according to the following table:
|
INSPECTION |
DISPLAY |
ACTION |
|
|---|---|---|---|
|
Start the LCD inspection mode.
|
 |
The characters displayed on the LCD are not truncated or faint.
|
The LCD is normal.
|
|
Except above
|
Replace the audio unit.
|
||
3. Turn the audio off or the ignition (F2, G6)/engine (WLT-1, WLT-2, WL-C, WE-C) switch to the LOCK position to stop the diagnostic assist function.
Speaker Inspection
1. With the audio power on, press the POWER/VOLUME button and simultaneously press the DISP/AUTO-M button for approx. 1s.
2. Inspect according to the following table:
|
INSPECTION |
DISPLAY |
ACTION |
|
|---|---|---|---|
|
• Start the speaker inspection mode.
• Does each speaker output sound in the following order?
|
—
|
Yes
|
Speakers, and wiring harness between the audio unit and speakers are normal.
|
|
No
|
• Inspect the following parts.
|
||
3. Turn the audio off or the ignition (F2, G6)/engine (WLT-1, WLT-2, WL-C, WE-C) switch to the LOCK position to stop the diagnostic assist function.
Radio Reception Condition Inspection
1. With the audio power on and at radio mode, press the POWER/VOLUME button and simultaneously press the Preset button 2 for approx. 1 s.
2. Inspect according to the following table:
|
INSPECTION |
DISPLAY |
ACTION |
|---|---|---|
|
Start the radio reception condition inspection mode.
|
 |
Antenna, antenna feeder and audio unit are normal
|
 |
Change the frequency (radio station) and inspect again.
|
|
 |
Inspect the antenna and antenna feeder.
|
3. Turn the audio off or the ignition (F2, G6)/engine (WLT-1, WLT-2, WL-C, WE-C) switch to the LOCK position to stop the diagnostic assist function.
Antenna control condition inspection
1. With the audio power on and at radio mode, press the POWER/VOLUME button and simultaneously press the FM 2 button for approx. 1 s.
2. Inspect the antenna control condition according to the following table:
|
Inspection |
Display |
Action |
|
|---|---|---|---|
|
Start antenna control condition inspection mode.
|
 |
Sound quality is good.
|
System is okay.
|
|
Sound quality is poor.
|
Inspect the roof antenna.
|
||
 |
Replace the audio unit.
|
||
3. Turn the audio off or the ignition (F2, G6)/engine (WLT-1, WLT-2, WL-C, WE-C) switch to the LOCK position to stop the diagnostic assist function.