|
absggw00001978
EXHAUST SYSTEM REMOVAL/INSTALLATION [WL-C, WE-C]
id0115b6800200
1. Disconnect the negative battery cable.
2. Remove the engine cover.
3. Remove the air cleaner. (See INTAKE-AIR SYSTEM REMOVAL/INSTALLATION [WL-C, WE-C].)
4. Remove the EGR cooler. (See EGR VALVE REMOVAL/INSTALLATION [WL-C, WE-C].)
5. Remove in the order indicated in the table.
6. Install in the reverse order of removal.
7. Start the engine and:
absggw00001978
|
|
1
|
Main silencer
|
|
2
|
Oxidation catalytic converter
|
|
3
|
Presilencer
|
|
4
|
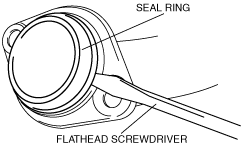
Seal Ring
(See Seal Ring Removal Note.)
(See Seal Ring Installation Note.)
|
|
5
|
Front pipe
(See Front Pipe Installation Note.)
|
|
6
|
Middle pipe
|
|
7
|
Exhaust manifold insulator
|
|
8
|
Turbocharger insulator
|
|
9
|
Water pipe
(See Water Pipe Removal Note.)
(See Water Pipe Installation Note.)
|
|
10
|
Oil pipe
|
|
11
|
Oil hose (supply)
|
|
12
|
Turbocharger
|
|
13
|
Joint pipe
|
|
14
|
Exhaust manifold
|
Seal Ring Removal Note
1. Remove the seal ring using a flathead screwdriver being careful not to damage the pipe.
acxaaw00000754
|
Water Pipe Removal Note
1. Drain the engine coolant before removing the water pipe. (See ENGINE COOLANT REPLACEMENT [WL-C, WE-C].)
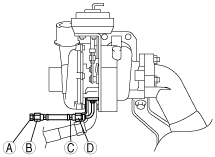
Oil Hose (Supply) Installation Note
1. Secure section A using a spanner.
absggw00000574
|
2. Tighten the nut at B.
3. Hold section C using pliers.
4. Tighten the nut at D.
Water Pipe Installation Note
1. Refill the engine coolant after Installing the water pipe. (See ENGINE COOLANT REPLACEMENT [WL-C, WE-C].)
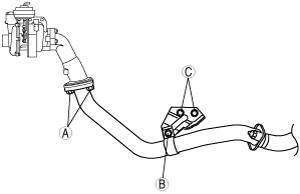
Front Pipe Installation Note
1. Temporarily tighten the nuts A.
absggw00000575
|
2. Temporarily tighten the bolts B and C.
3. Completely tighten the nuts A.
4. Completely tighten the bolts B and C.
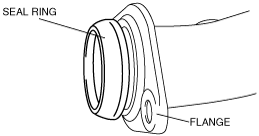
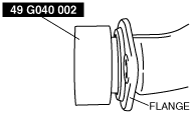
Seal Ring Installation Note
1. Temporarily install the seal ring to the pipe so that the seal ring is even with the flange.
acxaaw00000755
|
2. Install the SST to the seal ring so that the SST is even with the flange.
amxuuw00000780
|
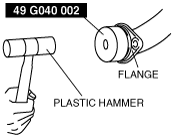
3. Press in the seal ring by tapping the SST using a plastic hammer until the seal ring contacts the flange.
amxuuw00000781
|