 |
dbg711zwb029
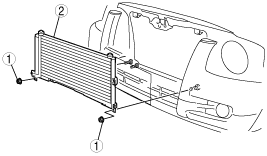
CONDENSER REMOVAL/INSTALLATION
id071100801200
1. Disconnect the negative battery cable.
2. Discharge the refrigerant from the system. (See REFRIGERANT CHARGING.)
3. Remove the radiator grill. (See RADIATOR GRILLE REMOVAL/INSTALLATION.)
4. Remove the charge air cooler. (See INTAKE-AIR SYSTEM REMOVAL/INSTALLATION [WL-3].) (See INTAKE-AIR SYSTEM REMOVAL/INSTALLATION [WL-C, WE-C].)
5. Disconnect the cooler hose (HI) and cooler pipe. Do not allow remaining compressor oil in the refrigerant line to spill.
6. Remove in the order indicated in the table.
dbg711zwb029
|
|
1
|
Nut
|
|
2
|
Condenser
(See Condenser Installation Note.)
|
7. Install in the reverse order of removal.
8. Perform the refrigerant system performance test. (See REFRIGERANT SYSTEM PERFORMANCE TEST.)
Condenser Installation Note
1. After replacing the condenser, add compressor oil to the refrigeration cycle.