 |
dcf711zw3a10
THERMOSWITCH INSPECTION
id074000830600
To Determine if the Switch is Functioning
1. Remove the glove compartment. (See GLOVE COMPARTMENT REMOVAL/INSTALLATION.)
2. Start the engine.
3. Turn the fan switch on.
4. Turn the A/C switch on.
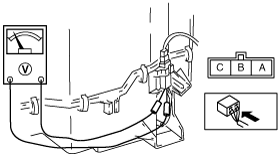
5. Connect the positive (+) probe of the voltmeter to terminal B of the thermoswitch connector and the negative (-) probe to terminal C. (The wiring harness connector must be connected to the thermoswitch connector.)
6. Measure the voltage as shown below.
|
Magnetic clutch |
Voltage (V) |
|---|---|
|
On
|
B+
|
|
Off
|
0
|
dcf711zw3a10
|
7. If not as specified, inspect on/off points of the thermoswitch.
To Inspect On/Off Points of the Thermoswitch
1. Disconnect the negative battery cable.
2. Remove the cooling unit. (See COOLING UNIT REMOVAL/INSTALLATION.)
3. Remove the thermoswitch. (See COOLING UNIT DISASSEMBLY/ASSEMBLY.)
4. Connect the negative battery cable.
5. Connect the thermoswitch connector to the wiring harness connector.
6. Turn the engine switch to ON position.
7. Turn the A/C switch on.
8. Turn the fan switch on.
9. Immerse the sensor part of thermoswitch in a container of ice water.
10. Connect the positive (+) probe of the voltmeter to terminal B of the thermoswitch connector and the negative (-) probe to terminal C.
11. Measure the voltage as shown below.
|
Water temperature |
Voltage (V) |
|---|---|
|
3 °C {37 °F} or more
|
B+
|
|
1 °C {34 °F} or less
|
0
|
dcf711zw3a10
|
12. If not as specified, replace the thermoswitch. (See COOLING UNIT DISASSEMBLY/ASSEMBLY.)