1. Component views
Engine mounting
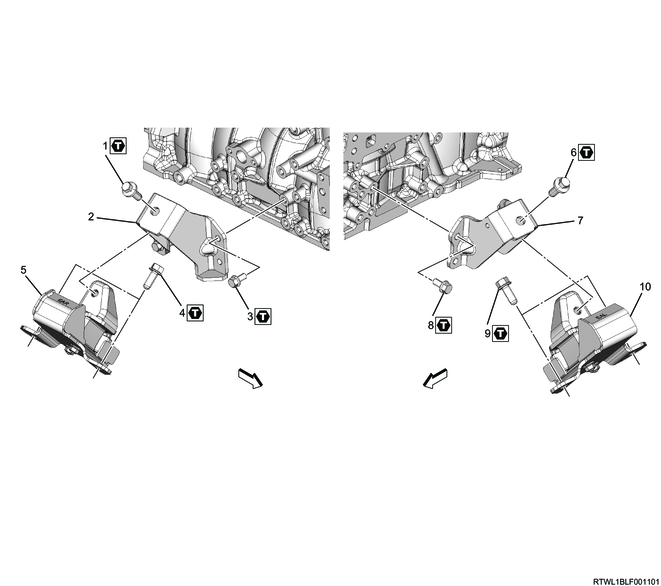
Part name
- Bolt
- Right side engine foot
- Bolt
- Bolt
- Right side engine mounting
- Bolt
- Left side engine foot
- Bolt
- Bolt
- Left side engine mounting
Tightening torque
1: 131 N・m { 13.4 kgf・m / 97 lb・ft }
3: 52 N・m { 5.3 kgf・m / 38 lb・ft }
4: 116 N・m { 11.8 kgf・m / 86 lb・ft }
6: 131 N・m { 13.4 kgf・m / 97 lb・ft }
8: 52 N・m { 5.3 kgf・m / 38 lb・ft }
9: 116 N・m { 11.8 kgf・m / 86 lb・ft }
2. Engine mounting installation
1) Hold up the engine as high as not to be lifted up.
2) Install the engine mounting to the frame.
Tightening torque: 116 N・m { 11.8 kgf・m / 86 lb・ft }
Caution
- Check the marking on the engine mounting.
| Marking |
Transmission |
Left/Right |
| EL |
MT |
Left |
| ER |
Right |
|
| EAL |
AT |
Left |
| EAR |
Right |
3) Lower the engine.
4) Connect the engine mounting to the engine foot.
Note
- Tighten the engine mounting fixing bolts from above the engine using an extension bar that is 600 mm {23.6 in} or longer.
Caution
- Tighten bolts while the engine foot is securely seated on the engine mounting to prevent bolts from loosening.
Tightening torque: 131 N・m { 13.4 kgf・m / 97 lb・ft }
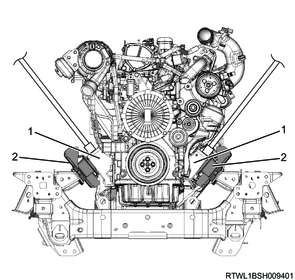
Legend
- Engine foot
- Engine mounting
5) Remove the special tool from the generator bracket and flywheel housing.
3. Cowl panel installation
1) Install the cowl panel to vehicle.

4. Wiper linkage installation
5. Engine hood installation
1) Align the hinge to the marking position placed during removal, and temporarily secure.
2) Adjust the clearance between the engine hood and the fender to the standard value.
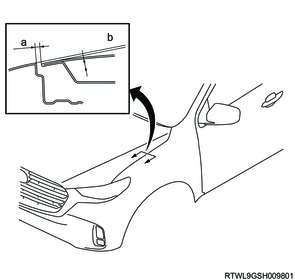
Dimensions
a. Clearance: 4.0 mm {0.16 in}
b. Height, level difference: -1.5 mm {-0.06 in}
3) Final tighten the hinge bolt to the engine hood.
Tightening torque: 6.5 N・m { 0.7 kgf・m / 58 lb・in }
6. Engine hood adjustment
1) Turn the hood rest to adjust its height, and adjust the level difference against the engine hood.
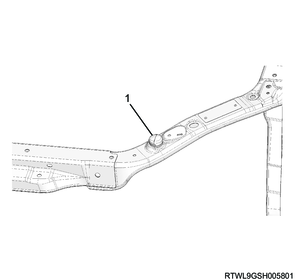
Legend
- Hood rest
7. Underguard installation
8. Preliminary and post procedures
1. Post procedures
1) Lower the vehicle.
2) Connect the battery cable to the battery negative terminal.
3) Referring to the following, perform the setting of the front door power window switch with AUTO UP/AUTO DOWN function.
Refer to "9.Body, Cab, Accessories 9T.Glass, Windows, Mirrors front door power window switch setting".
4) Close the engine hood.