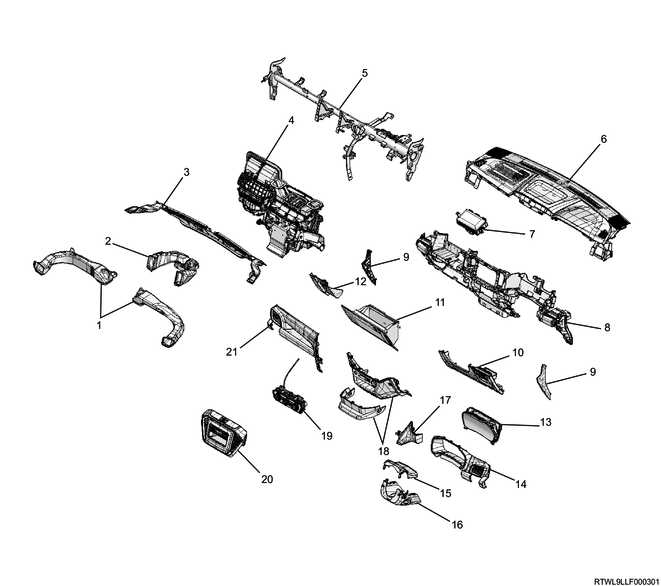
1. Component views
Instrument panel (High grade type)

Part name
- Ventilation duct
- Center ventilation duct
- Defroster nozzle
- Heater evaporator unit
- Reinforcement
- Instrument panel (Upper side)
- Antenna
- Passenger airbag
- Instrument panel (Lower side)
- Side cover
- Instrument panel driver-side lower cover
- Instrument panel cluster
- Meter cluster
- Steering upper cowl
- Steering lower cowl
- Instrument panel (Middle side)
- Center console
- Control panel
- Audio center unit
- Bezel
- Audio
- Glove box
- Instrument panel passenger-side lower cover
- Instrument panel passenger-side upper cover
Instrument panel (Low grade type)
Part name
- Ventilation duct
- Center ventilation duct
- Defroster nozzle
- Heater evaporator unit
- Reinforcement
- Instrument panel (Upper side)
- Passenger airbag
- Instrument panel (Lower side)
- Side cover
- Instrument panel driver-side lower cover
- Glove box
- Instrument panel passenger-side lower cover
- Instrument panel cluster
- Meter cluster
- Steering upper cowl
- Steering lower cowl
- Instrument panel (Middle side)
- Center console
- Control panel
- Bezel
- Instrument panel passenger-side upper cover
2. Instrument panel installation
1) Install the instrument panel (lower side) to the reinforcement.
Tightening torque: 2.5 N・m { 0.25 kgf・m / 22.1 lb・in }

Legend
- Instrument panel (Lower side)
- Screw
- Tapping screw
2) Install the harness clip to the instrument panel (lower side).
3) Connect the connector and aspirator hose to the inside air temperature sensor.
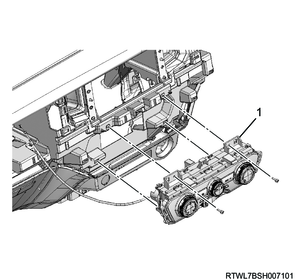
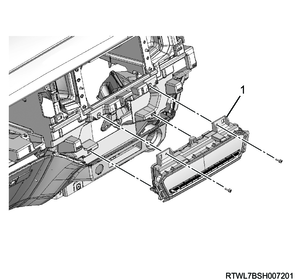
4) Install the junction block to the instrument panel (lower side).
Tightening torque: 7.0 N・m { 0.7 kgf・m / 62 lb・in }

Legend
- Junction block
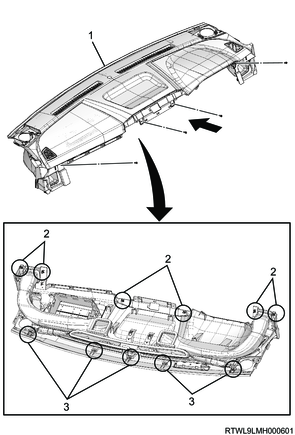
5) Install the instrument panel (upper side) to the instrument panel (lower side).
Tightening torque: 2.5 N・m { 0.25 kgf・m / 22.1 lb・in }
High grade type

Legend
- Instrument panel (Upper side)
- Clip
- Claw section
Low grade type
Legend
- Instrument panel (Upper side)
- Clip
- Claw section
6) Connect the connector to the instrument panel (upper side).
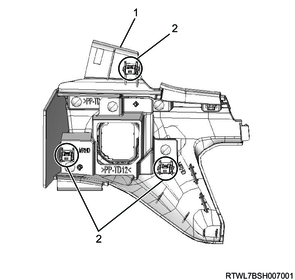
7) Connect the passenger airbag to the reinforcement.
Tightening torque: 25 N・m { 2.5 kgf・m / 18 lb・ft }
8) Install the side cover to the instrument panel.
Legend
- Side cover
- Claw section
3. CD/DVD player installation
1) Install the bracket to the instrument panel.
Tightening torque: 2.5 N・m { 0.25 kgf・m / 22.1 lb・in }

Legend
- Bracket
- Screw
2) Connect the connector to the CD/DVD player.
3) Install the CD/DVD player to the instrument panel.
Tightening torque: 2.5 N・m { 0.25 kgf・m / 22.1 lb・in }

Legend
- CD/DVD player
- Screw
4. Console box installation
1) Connect the connector to the console box.
2) Install the console box to the floor.
3) Install the console cover to the console box.
4) Install the cup holder to the console cover.
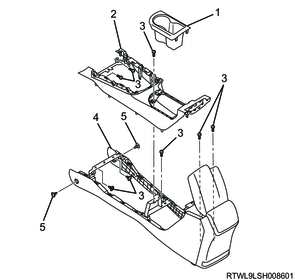
Legend
- Cup holder
- Console cover
- Screw
- Console box
- Clip
5. Shift console cover installation
1. A/T models
1) Connect the connector to the shift console cover.
2) Install the shift console cover to the console box.
3) Install the pads to the console box.
Legend
- Pad
- Clip position
4) Install the selector lever knob to the selector lever.
Caution
- Do not forget to install the clip.
Legend
- Clip
2. M/T models
1) Connect the connector to the shift console cover.
2) Install the shift console cover to the console box.
3) Install the pads to the console box.
Legend
- Pad
- Clip position
4) Install the shift knob to the shift lever.
Tightening torque: 4.0 N・m or more { 0.41 kgf・m or more / 35.4 lb・in or more }
Note
- After tightening to the specified torque, retighten so that the shift pattern direction is correct.
6. Center console installation
1) Connect the connector to the center console.
2) Install the center console to the instrument panel.
Models with console boxes

Legend
- Center console
Except models with console boxes
Legend
- Center console
- Extension
7. Control panel and control lever installation
1. Models with manual A/C
1) Connect the connector to the control panel.
2) Install the control lever to the instrument panel.
Tightening torque: 2.3 N・m { 0.23 kgf・m / 20.4 lb・in }
Legend
- Control lever
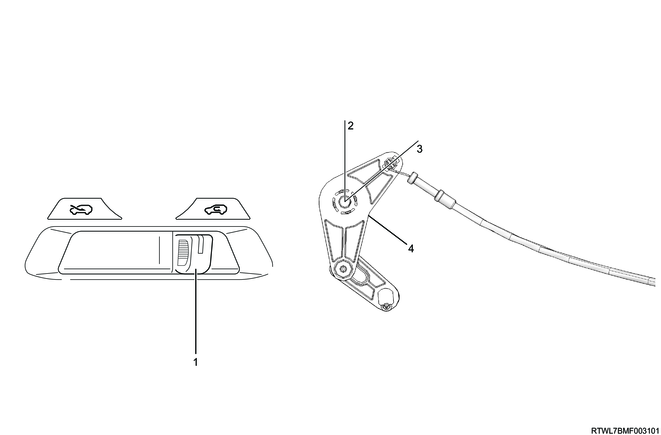
3) Set the intake lever and air source select lever to the RECIRC position.
RHD

Legend
- RECIRC position
- FRESH position
- Intake lever
- Air source select lever
LHD
Legend
- Air source select lever
- FRESH position
- RECIRC position
- Intake lever
4) Connect the control cable to the intake lever.
5) Secure the control cable to the lock clamp section.
6) Inspect whether the control lever operates properly.
7) Install the instrument panel (middle side) to the instrument panel (lower side).
RHD
Legend
- Instrument panel (Middle side)
- Clip
LHD

Legend
- Instrument panel (Middle side)
- Clip
2. Models with auto A/C
1) Connect the connector to the control panel.
2) Install the control panel to the instrument panel.
Tightening torque: 2.3 N・m { 0.23 kgf・m / 20.4 lb・in }
Legend
- Control panel
3) Install the instrument panel (middle side) to the instrument panel (lower side).
RHD
Legend
- Instrument panel (Middle side)
- Clip
LHD
Legend
- Instrument panel (Middle side)
- Clip
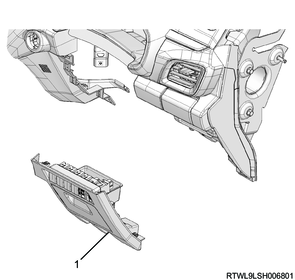
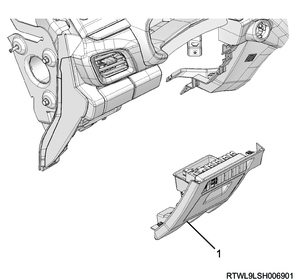
8. Instrument panel cluster installation
1) Connect the connector to the instrument panel cluster.
2) Install the instrument panel cluster to the instrument panel.
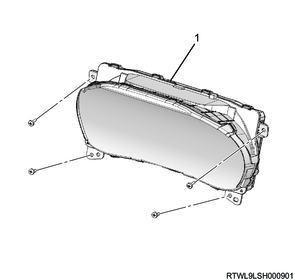
Legend
- Instrument panel cluster
9. Meter cluster installation
1) Install the meter cluster to the instrument panel.
RHD
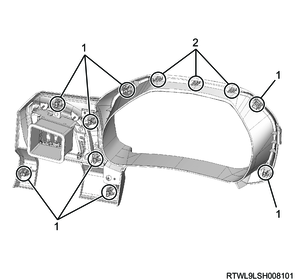
Legend
- Clip
- Claw section
LHD
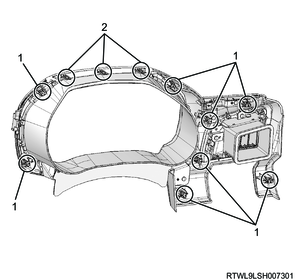
Legend
- Clip
- Claw section
10. Instrument panel passenger-side upper cover installation
1) Install the instrument panel passenger-side upper cover to the instrument panel.
Tightening torque: 2.5 N・m { 0.25 kgf・m / 22.1 lb・in } High grade type
High grade type (RHD)
Legend
- Instrument panel passenger-side upper cover
- Screw
High grade type (LHD)
Legend
- Instrument panel passenger-side upper cover
- Screw
Low grade type (RHD)
Legend
- Instrument panel passenger-side upper cover
Low grade type (LHD)
Legend
- Instrument panel passenger-side upper cover
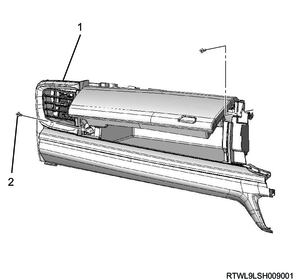
11. Audio and navigation system installation
1. Models equipped with display units
1) Connect the connector to the audio center unit.
2) Install the audio center unit to the instrument panel.
Tightening torque: 2.6 N・m { 0.27 kgf・m / 23.0 lb・in }
Legend
- Audio center unit
3) Connect the connector to the display unit.
4) Install the display unit as a set with the bezel to the instrument panel.
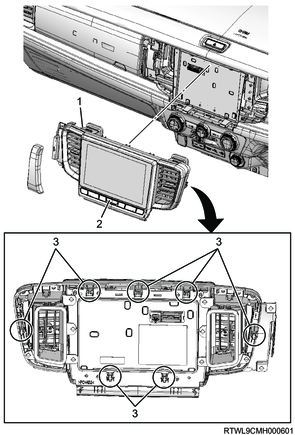
Legend
- Bezel
- Display unit
- Clip
2. Models equipped with 2DIN audio
1) Install the bracket to the instrument panel.
Tightening torque: 2.0 N・m { 0.2 kgf・m / 18 lb・in }
Legend
- Bracket
2) Connect the connector to the 2DIN audio.
3) Install the 2DIN audio as a set with the bezel to the instrument panel.
Note
- Align the pin position with the bracket to install.
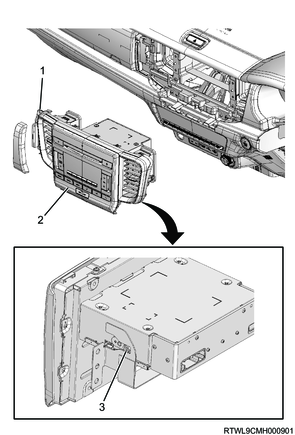
Legend
- Bezel
- 2DIN audio
- Pin
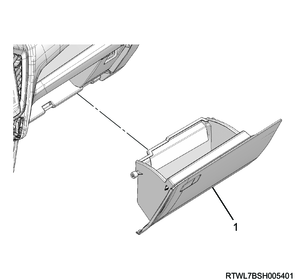
12. Instrument panel passenger-side lower cover installation
1) Connect the connector to the instrument panel passenger-side lower cover.
2) Install the instrument panel passenger-side lower cover to the instrument panel.
RHD

Legend
- Instrument panel passenger-side lower cover
- Clip
LHD
Legend
- Instrument panel passenger-side lower cover
- Clip
13. Glove box installation
1) Install the glove box to the instrument panel.
RHD
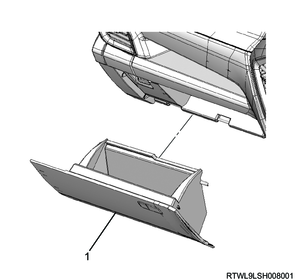
Legend
- Glove box
LHD
Legend
- Glove box
14. Instrument panel driver-side lower cover installation
1. Models with knee airbags
1) Connect the connector to the instrument panel driver-side lower cover.
2) Install the instrument panel driver-side lower cover to the instrument panel.
RHD
Legend
- Instrument panel driver-side lower cover
LHD
Legend
- Instrument panel driver-side lower cover
3) Install the hood lock control lever and fuel filler lid opener lever to the instrument panel driver-side lower cover.
RHD
Legend
- Hood lock control lever
- Fuel filler lid opener lever
- Claw section
LHD
Legend
- Fuel filler lid opener lever
- Hood lock control lever
- Claw section
4) Connect the wire to each lever.
2. Models without knee airbags
1) Connect the connector to the instrument panel driver-side lower cover.
2) Install the instrument panel driver-side lower cover to the instrument panel.
RHD

Legend
- Instrument panel driver-side lower cover
LHD
Legend
- Instrument panel driver-side lower cover
3) Install the hood lock control lever and fuel filler lid opener lever to the instrument panel driver-side lower cover.
RHD
Legend
- Hood lock control lever
- Fuel filler lid opener lever
- Claw section
LHD
Legend
- Fuel filler lid opener lever
- Hood lock control lever
- Claw section
4) Connect the wire to each lever.
15. Knee air bag installation
1. Models with knee airbags
Refer to "8.Restraints 8B.Airbag Systems knee air bag installation".
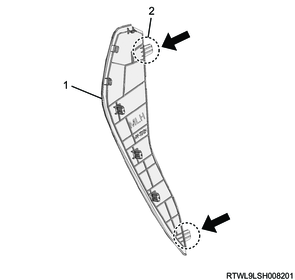
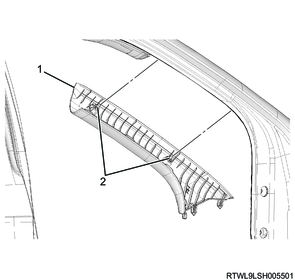
16. Front pillar trim cover installation
1. Models with assist grips
1) Install the front pillar trim cover to the front pillar.
2) Install the assist grip to the front pillar trim cover.
Tightening torque: 3.8 N・m { 0.4 kgf・m / 34 lb・in }
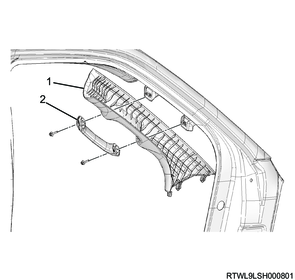
Legend
- Front pillar trim cover
- Assist grip
2. Models without assist grips
1) Install the assist grip to the front pillar trim cover.
Legend
- Front pillar trim cover
- Clip
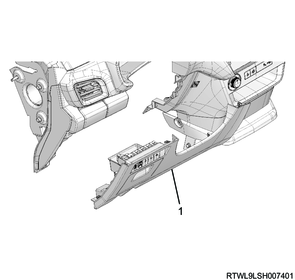
17. Front door finisher installation
1) Install the front door finisher to the body.
18. Front sill plate installation
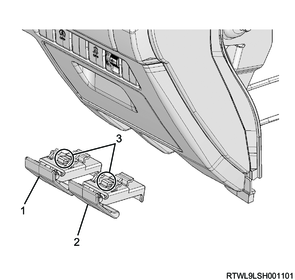
1) Install the front sill plate to the floor.
Regular cab, crew cab

Legend
- Front sill plate
- Clip
- Claw section
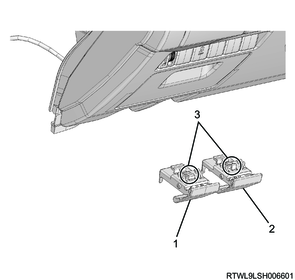
Extend cab
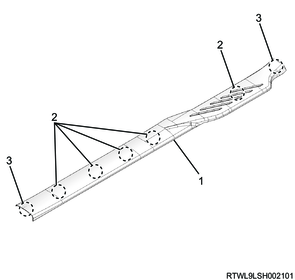
Legend
- Front sill plate
- Clip
- Claw section
19. Preliminary and post procedures
1. Post procedures
1) Connect the battery cable to the battery negative terminal.
2) Referring to the following, perform the setting of the front door power window switch with AUTO UP/AUTO DOWN function.
Refer to "9.Body, Cab, Accessories 9T.Glass, Windows, Mirrors front door power window switch setting".
3) Close the engine hood.