1. Component views
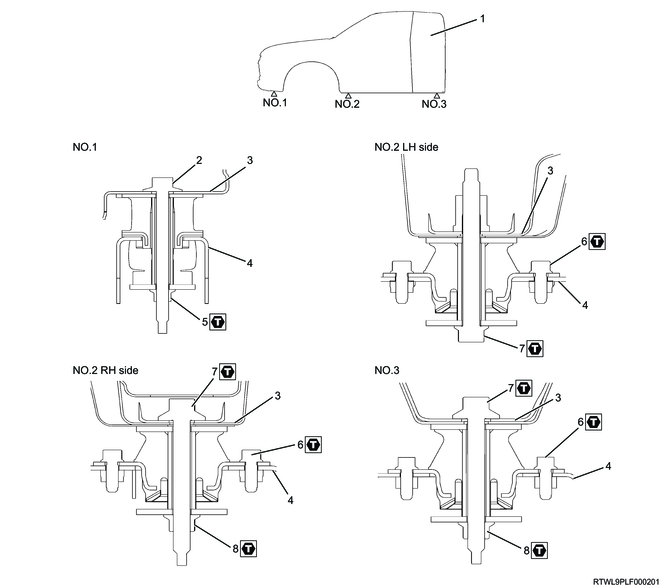
Body mounting (Regular cab, crew cab)

Part name
- Regular cab
- Crew cab
- Bolt
- Cab side
- Frame side
- Nut
- Bolt
- Bolt
- Nut
Tightening torque
6: 50 N・m { 5.1 kgf・m / 37 lb・ft }
7: 60 N・m { 6.1 kgf・m / 44 lb・ft }
8: 150 N・m { 15.3 kgf・m / 111 lb・ft }
9: 150 N・m { 15.3 kgf・m / 111 lb・ft }
Body mounting (Extend cab)
Part name
- Extend cab
- Bolt
- Cab side
- Frame side
- Nut
- Bolt
- Bolt
- Nut
Tightening torque
5: 50 N・m { 5.1 kgf・m / 37 lb・ft }
6: 60 N・m { 6.1 kgf・m / 44 lb・ft }
7: 150 N・m { 15.3 kgf・m / 111 lb・ft }
8: 150 N・m { 15.3 kgf・m / 111 lb・ft }
2. Body mounting safety information
Warning
- Do not get under the body while lifting up the body.
Caution
- Perform the procedure in a flat location.
- Secure the vehicle using chock blocks.
3. Front sill plate removal
1) Remove the front sill plate from the floor.
Regular cab, crew cab

Legend
- Front sill plate
- Clip
- Claw section
Extend cab
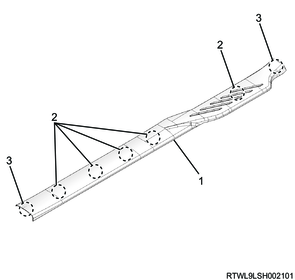
Legend
- Front sill plate
- Clip
- Claw section
4. Front door finisher removal
1) Remove the front door finisher from the body.
5. Dash side trim pad removal
1) Remove the dash side trim pad from the body.
Right side
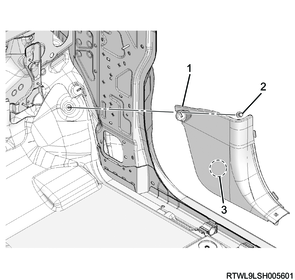
Legend
- Dash side trim pad
- Retainer
- Clip
6. Rear sill plate removal
1. Crew cab
1) Remove the rear sill plate from the floor.
Legend
- Rear sill plate
- Clip
- Claw section
7. Rear door finisher removal
1. Crew cab
1) Remove the rear door finisher from the body.
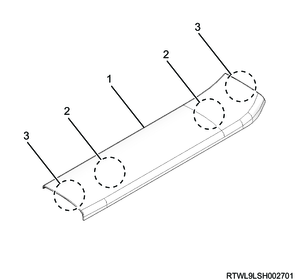
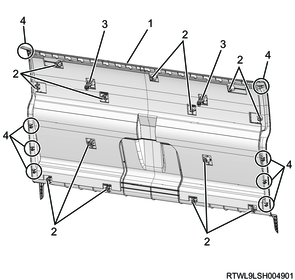
8. Rear end upper trim cover removal
1. Regular cab
1) Remove the rear end upper trim cover from the body panel.

Legend
- Claw section
- Rear end upper trim cover
- Clip
- Hook
2. Crew cab
1) Remove the rear end upper trim cover from the body panel.
Caution
- For models with center top tethers (bracket type), disengage the clips and claws, and then pull upward while bending the end of the rear end upper trim to an extent that it will not get damaged.
Models with center top tethers (bracket type)
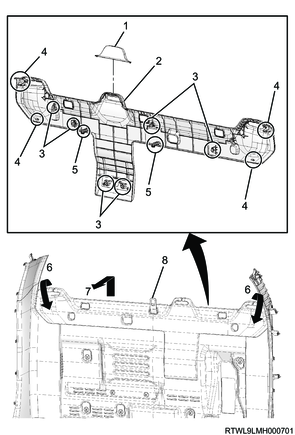
Legend
- Seat belt guide cover
- Rear end upper trim cover
- Clip
- Claw section
- Hook
- Bend the end of the rear end upper trim cover.
- Pull out the rear end upper trim upward.
- Center top tether (Bracket type)
Models without center top tethers (bracket type)

Legend
- Seat belt guide cover
- Rear end upper trim cover
- Clip
- Claw section
- Hook
9. Rear pillar trim cover removal
1. Regular cab
1) Remove the seat belt lower anchor bolt from the rear pillar.
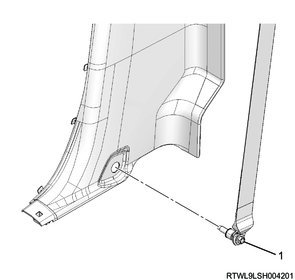
Legend
- Seat belt lower anchor bolt
2) Remove the rear pillar lower trim cover from the rear pillar.
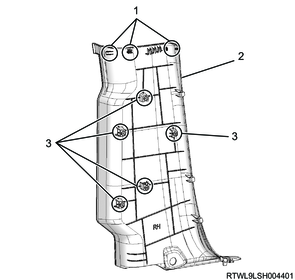
Legend
- Claw section
- Rear pillar lower trim cover
- Clip
2. Crew cab
1) Remove the rear pillar lower trim cover from the rear pillar.
Legend
- Claw section
- Rear pillar lower trim cover
- Clip
3. Extend cab
1) Remove the rear end trim cover from the body panel.
Legend
- Rear end trim cover
- Clip
- Hook
- Claw section
2) Remove the seat belt lower anchor bolt from the floor panel.
Legend
- Seat belt lower anchor bolt
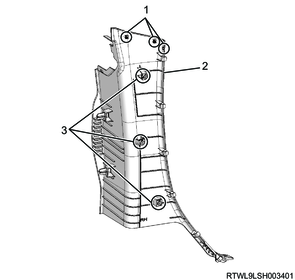
3) Remove the rear pillar lower trim cover from the rear pillar.

Legend
- Claw section
- Rear pillar lower trim cover
- Clip
10. Side cover removal
1) Remove the side cover from the hinge bracket.
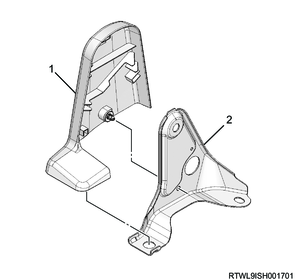
Legend
- Side cover
- Hinge bracket
11. Front bumper removal
12. Mud skirt cover removal
1) Remove the mud skirt cover from the vehicle.
Legend
- Mud skirt cover
13. Side step removal
1) Remove the side step from the vehicle.
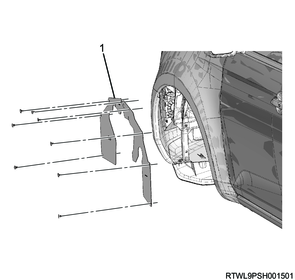
14. Rear mudguard removal
1) Remove the rear mudguard from the rear body.
15. Inner liner removal
1) Remove the inner liner from the rear body.
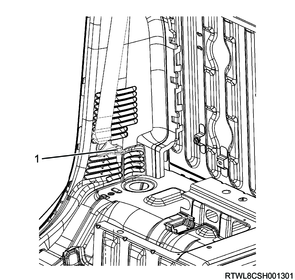
16. Body mounting removal
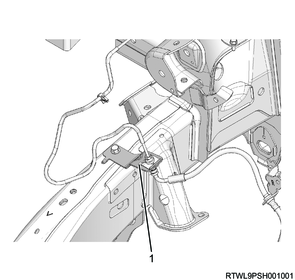
1) Disconnect the brake pipe bracket from the frame.
Caution
- Do not damage the brake pipe while the brake pipe bracket is disconnected.
Left side

Legend
- Brake pipe bracket
Right side
Legend
- Brake pipe bracket
2) Peel the floor carpet and remove the grommet from the floor panel.
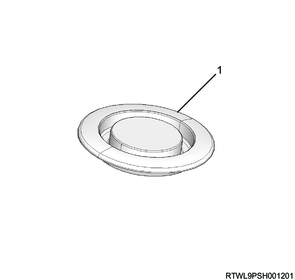
Legend
- Grommet
Warning
- For the following work, do not work simultaneously on the left and right, but work by each side.
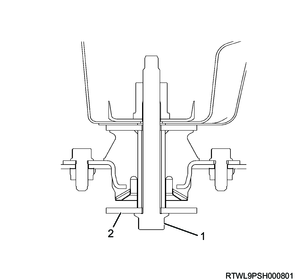
3) Remove the bolt, nut, and washer from the body mounting, and disconnect the body and frame.
No. 1
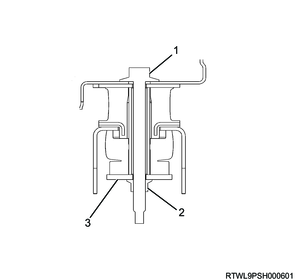
Legend
- Bolt
- Nut
- Lower bushing
No. 2 (RH) and No. 3
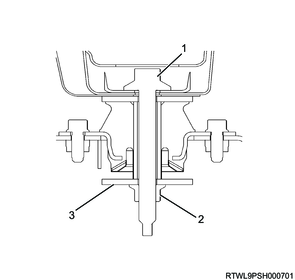
Legend
- Bolt
- Nut
- Washer
No. 2 (LH)
Legend
- Bolt
- Washer
4) Lift up the body within the range of 31 mm {1.22 in} to 39 mm {1.54 in}.
Warning
- Do not put your hands, etc., in the gap between the body and the frame while lifting up.
Caution
- Do not lift the body by 40 mm {1.57 in} or more because the brake pipe may be damaged or bent.

Legend
- Lifting point
Dimensions
a: 31 to 39 mm { 1.22 to 1.54 in }
5) Remove the body mounting from the frame.