1. Transponder key safety information
If replacing or adding the transponder key, it is necessary to write the vehicle information into the new transponder key.
During the replacement procedure, the same scan tool must be used from start to finish. If the scan tool is changed midway, information cannot be written correctly.
Use the following procedure when replacing or programming the transponder key.
| Transponder key replacement procedure |
||
| Models with keyless entry |
Models without keyless entry |
|
| 1 |
Reset Transponder Key |
Reset Transponder Key |
| 2 |
Reset Keyless Entry Key*1 |
- |
| 3 |
Transponder key replacement |
Transponder key replacement |
| 4 |
Keyless Entry Key Registration*1 |
- |
| 5 |
Transponder Key Registration |
Transponder Key Registration |
Note
- *1: Refer to the following for keyless entry key settings.
Refer to "9.Body, Cab, Accessories 9J.Security and Locks keyless entry key setting".
1. Reset Transponder Key
The "Reset Transponder Key" procedure must be performed with a scan tool if the following conditions are met.
- The owner has lost a transponder key.
- Malfunctioning transponder key replacement
Caution
- If the owner has lost a transponder key, it is necessary to erase the existing transponder key information from the wireless access module memory in order to prevent possible vehicle theft. Because all transponder key information will be lost using this procedure, perform the reprogramming of the remaining transponder keys or the programming of new transponder keys.
2. Transponder Key Registration
The "Transponder Key Registration" procedure must be performed if any of the following conditions are met.
- The diagnostic chart instructs you to replace the transponder keys.
- The diagnostic chart instructs you to program the transponder keys.
- Reprogramming is necessary because the transponder key information has been erased.
- The owner has requested additional transponder keys.
Caution
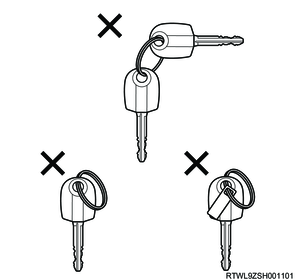
- Keep the transponder keys to be programmed away from other transponder keys or metal objects. Not doing so may result in a transponder key programming failure.
Note
- Usually, 2 or 3 transponder keys are provided with each new vehicle. Owners requiring additional keys can receive up to a total of 5 transponder keys.
2. Transponder key setting
1. Reset Transponder Key
Caution
- Because all transponder key information will be lost using this procedure, reprogramming of the remaining transponder keys or programming of new transponder keys will be required.
1) Connect the scan tool to the DLC.
2) Turn ON the ignition switch.
Note
- If the ignition switch cannot be turned ON, open the driver-side front door so that the wireless access module can communicate with a scan tool.
3) Select "Reset Transponder Key" on the scan tool.
- Diagnostics > Body > WAM (Wireless Access Module) > Special Function > Transponder Keys > Reset Transponder Key
4) Erase any transponder key information on the wireless access module by following the on-screen instructions.
Caution
- Security wait time will be entered into if an incorrect security code is entered.
5) Turn OFF the ignition switch for 30 seconds.
6) Verify that the engine does not start with all transponder keys.
2. Transponder Key Registration
1) Connect the scan tool to the DLC.
2) Turn ON the ignition switch.
Note
- If the ignition switch cannot be turned ON, open the driver-side front door so that the wireless access module can communicate with a scan tool.
3) Select "Transponder Key Registration" on the scan tool.
- Diagnostics > Body > WAM (Wireless Access Module) > Special Function > Transponder Keys > Transponder Key Registration
4) Program the transponder key information into the wireless access module by following the on-screen instructions.
Caution
- Security wait time will be entered into if an incorrect security code is entered.
- Keep the transponder keys to be programmed away from other keys, transponder keys, or metal objects.
5) Turn OFF the ignition switch for 30 seconds.
6) Verify that the engine starts with all transponder keys.