CAR-NAVIGATION UNIT REMOVAL/INSTALLATION
id092000801000
-
Caution
-
• The audio unit determines the presence/non-presence of a car-navigation unit and records it based on the communication status when the ignition is switched ON (engine off or on) or to the ACC position for the first time after the negative battery cable is connected.
• If the negative battery cable is connected while the audio unit has recorded the non-presence of the car-navigation unit and thereafter a car-navigation unit is installed, the installed car-navigation unit will not operate.
• When installing or removing the car-navigation unit, always disconnect the negative battery cable, and after the servicing is completed, switch the ignition to ACC or ON (engine off or on) to allow the audio unit to record the presence/non-presence of the car-navigation unit.
-
Note
-
• If the car navigation unit is replaced and the SD card prior to the replacement is used or a new SD card is used, after the replacement synchronize the SD card to the new car navigation unit.
• If map updates or fee-based services (such as Tom-Tom Live Service) are to be reused using the SD card prior to car navigation unit replacement, first obtain the customerÅfs acknowledgement that re-application to Tom-Tom online is required before replacing the car navigation unit.
1. Disconnect the negative battery cable. (See NEGATIVE BATTERY CABLE DISCONNECTION/CONNECTION [SKYACTIV-G 2.0, SKYACTIV-G 2.5].) (See NEGATIVE BATTERY CABLE DISCONNECTION/CONNECTION [SKYACTIV-G 2.0, SKYACTIV-G 2.5 (WITHOUT i-stop)].) (See NEGATIVE BATTERY CABLE DISCONNECTION/CONNECTION [SKYACTIV-D 2.2].)
2. Affix protective tape to the gaps between the car-navigation and lower panel as shown in the figure.
-
Caution
-
• Before inserting a flathead screwdriver into the gap between the car-navigation and lower panel, affix protective tape to prevent damage. Otherwise, the lower panel could be damaged by the flathead screwdriver.
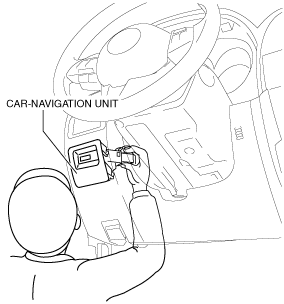
3. Insert your hand from the lower side of the lower panel and press the car-navigation unit so that there is a gap on the upper side of the car-navigation unit.
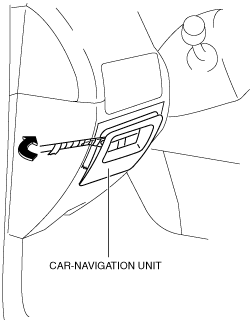
4. Insert a tape-wrapped fastener remover into the gap between the lower panel and car-navigation unit.
5. Move the fastener remover to the position of the arrow shown in the figure and detach the car-navigation unit clip from the lower panel.
6. Pull out the car-navigation unit and disconnect the connectors.
7. While pressing the tabs of the clip in the direction of arrows (1) shown in the figure, press the clip in the direction of arrow (2) to detach it from the car-navigation unit.
8. Remove the clip.
9. Remove the car-navigation unit.
10. Install in the reverse order of removal. (See Installation Note.)
11. If required, perform updating of the SD card. (See SD CARD UPDATING PROCEDURE.)
Installation Note
• Pressing the car-navigation unit when installing it could result in a malfunction. Therefore, press the panel area to install the car-navigation unit.