 |
ac5wzw00010542
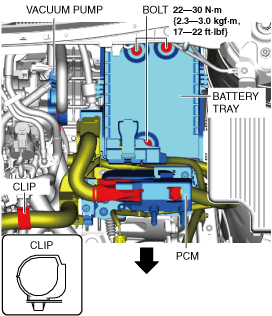
VACUUM PUMP REMOVAL/INSTALLATION [WITHOUT CYLINDER DEACTIVATION (SKYACTIV-G 2.0, SKYACTIV-G 2.5)]
id041100803667
Replacement Part
|
O-ring
Quantity: 1
Location of use: Vacuum pump
|
1. Disconnect the negative battery terminal. (See NEGATIVE BATTERY TERMINAL DISCONNECTION/CONNECTION.)
2. Remove the plug hole plate. (See PLUG HOLE PLATE REMOVAL/INSTALLATION [WITHOUT CYLINDER DEACTIVATION (SKYACTIV-G 2.0, SKYACTIV-G 2.5)].)
3. Remove the battery. (See BATTERY REMOVAL/INSTALLATION [WITHOUT CYLINDER DEACTIVATION (SKYACTIV-G 2.0, SKYACTIV-G 2.5)].)
4. Remove the following parts as a single unit. (See INTAKE-AIR SYSTEM REMOVAL/INSTALLATION [WITHOUT CYLINDER DEACTIVATION (SKYACTIV-G 2.0, SKYACTIV-G 2.5)].)
5. Disconnect the clip from the bracket.
ac5wzw00010542
|
6. Remove the bolts
7. Move the battery tray, PCM and wiring harness toward the front of the vehicle to the position where the vacuum pump can be removed.
8. Pinch open the clamp using pliers and disconnect the vacuum hose from the vacuum pump. (See VACUUM HOSE REMOVAL/INSTALLATION [L.H.D. (WITHOUT CYLINDER DEACTIVATION (SKYACTIV-G 2.0, SKYACTIV-G 2.5))].) (See VACUUM HOSE REMOVAL/INSTALLATION [R.H.D. (WITHOUT CYLINDER DEACTIVATION (SKYACTIV-G 2.0, SKYACTIV-G 2.5))].)
9. Remove in the order indicated in the table.
10. Install in the reverse order of removal.
ac5uuw00007501
|
|
1
|
Exhaust CMP sensor connector and wiring harness
|
|
2
|
Bolt
|
|
3
|
Vacuum pump
(See Vacuum Pump Removal Note.)
|
|
4
|
O-ring
|
Vacuum Pump Removal Note
1. When removing the vacuum pump, set a cloth to the underside of the vacuum pump installation surface so that engine oil does not adhere to other parts.
2. Remove the vacuum pump.
Vacuum Pump and O-ring Installation Note
1. Rotate the vacuum pump by hand to drain the remainder of the engine oil in the vacuum pump.
2. Degrease the O-ring installation groove and installation surface.
3. Install the new O-ring to the vacuum pump.
4. Install the vacuum pump.
