 |
ac5uuw00002145
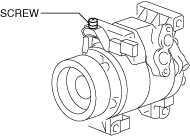
MAGNETIC CLUTCH DISASSEMBLY/ASSEMBLY [SKYACTIV-D 2.2]
id0711000063k5
Replacement Part
|
Bolt
Quantity: 1
Location of use: Magnetic clutch
|
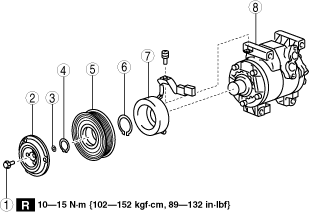
Magnetic Clutch is Disassembled/Assembled with A/C Compressor Removed from Vehicle
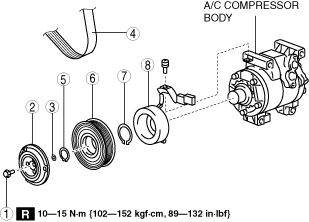
1. Disassemble in the order indicated in the table.
ac5uuw00002145
|
|
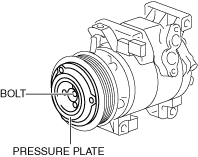
1
|
Bolt
|
|
2
|
Pressure plate
|
|
3
|
Shim
|
|
4
|
Snap ring
|
|
5
|
A/C compressor pulley
|
|
6
|
Snap ring
|
|
7
|
Stator
|
|
8
|
A/C compressor body
|
2. Assemble in the reverse order of disassembly.
3. Adjust the magnetic clutch clearance. (See MAGNETIC CLUTCH ADJUSTMENT [SKYACTIV-D 2.2].)
Bolt removal/installation note
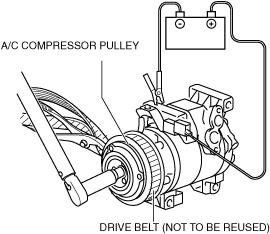
1. When removing or installing the bolt, lock the A/C compressor pulley against rotation using the following procedure.
ac5uuw00001184
|
ac5uuw00001185
|
2. When installing a new A/C compressor body, replace the recommended bolt.
Magnetic Clutch is Disassembled/Assembled with A/C Compressor Equipped to Vehicle
1. Remove the following parts:
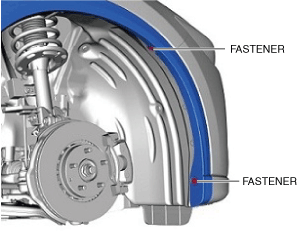
2. Remove the fasteners.
ac5wzw00008751
|
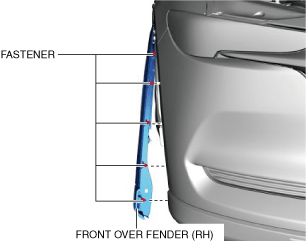
3. Remove the fasteners.
ac5wzw00008752
|
4. Bend back the front side of the front over fender (RH) as shown in the figure.
5. Remove the fasteners.
ac5wzw00008753
|
6. Remove screws A.
7. Bend back the front under cover No.1 in the direction of the arrow shown in the figure.
8. Remove screws B.
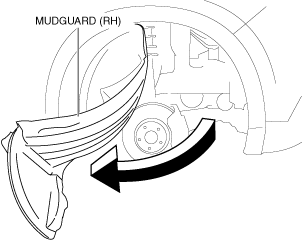
9. Bend back the front side of the mudguard (RH) in the direction of the arrow shown in the figure.
ac5wzw00008754
|
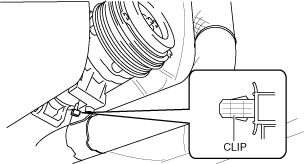
10. Detach the clip.
ac5wzw00008755
|
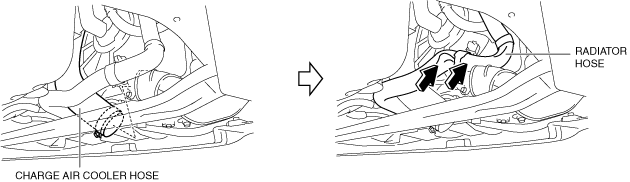
11. Disconnect the charge air cooler hose.
ac5wzw00008756
|
12. Set the radiator hose out of the way.
13. Disassemble in the order indicated in the table.
ac5wzw00006020
|
|
1
|
Bolt
|
|
2
|
Pressure plate
|
|
3
|
Shim
|
|
4
|
Drive Belt
|
|
5
|
Snap ring
|
|
6
|
A/C compressor pulley
|
|
7
|
Snap ring
|
|
8
|
Stator
|
14. Assemble in the reverse order of disassembly.
15. Adjust the magnetic clutch clearance. (See MAGNETIC CLUTCH ADJUSTMENT [SKYACTIV-D 2.2].)
Bolt removal/installation note
1. When removing or installing the bolt, lock the A/C compressor pulley against rotation using the following procedure.
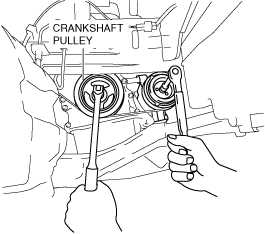
2. Secure the crankshaft pulley.
ac5uuw00003876
|
3. Remove the bolt with the pressure plate secured.
ac5wzw00006022
|
ac5wzw00008757
|
4. Turn the A/C relay off using the "ACCS" simulation function.
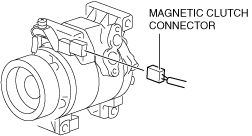
Stator removal/installation note
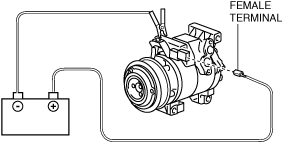
1. Disconnect the negative battery terminal. (See NEGATIVE BATTERY TERMINAL DISCONNECTION/CONNECTION.)
2. Disconnect the magnetic clutch connector.
ac5wzw00006025
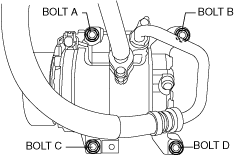
|
3. Remove the bolts A, B, and C.
ac5wzw00006026
|
4. Loose bolt D approx. 5 mm {0.2 in}.
5. Tilt the A/C compressor centered around bolt D.
ac5wzw00006027
|
6. Remove the screw.
ac5wzw00006028
|
7. Remove the stator.
ac5wzw00006029
|