AIR FUEL RATIO (A/F) SENSOR REMOVAL/INSTALLATION [SKYACTIV-D 2.2]
id0140z7899700
-
Warning
-
• A hot engine and exhaust system can cause severe burns. Turn off the engine and wait until they are cool before removing the exhaust system.
-
Caution
-
• Do not allow flammable objects such as the taping for bundling a wiring harness to come into contact with the catalytic converter.
-
Note
-
• If penetrant lubricating spray penetrates the airflow hole of the A/F sensor, it could cause interference with the A/F sensor function.
• When removing the A/F sensor, wrap a rag around the lower position so that penetrant lubricating spray does not get sprayed into the airflow hole.
Operation After Replacing A/F Sensor
1. If the A/F sensor is replaced, perform the following procedure.
|
Step
|
Action
|
Page
|
|
1
|
Perform the A/F sensor data reset procedure.
|
|
|
2
|
Switch the ignition off.
|
—
|
|
3
|
Wait for 20 s.
|
—
|
|
4
|
Perform the KOEO self test procedure.
|
|
|
5
|
Start the engine.
|
—
|
|
6
|
Verify that the check engine light does not illuminate.
|
—
|
|
7
|
Perform the KOER self test procedure.
|
|
|
8
|
Perform the compulsory diesel particulate filter regeneration procedure.
|
|
|
9
|
Perform the following procedure.
-
Caution
-
• If the M-MDS is connected to the DLC-2, disconnect the M-MDS. Otherwise, it could adversely affect safety when performing the procedure.
1. Vehicle is traveling at a speed of 50 km/h {31 mph} or more.
2. Release the accelerator pedal at a vehicle speed of 50 km/h {31 mph} or more and maintain this condition for 6 s.
|
—
|
|
10
|
Verify that the PID “O2S11_CAL” value is other than 0.
|
|
A/F Sensor Removal/Installation
1. Disconnect the negative battery cable. (See NEGATIVE BATTERY CABLE DISCONNECTION/CONNECTION [SKYACTIV-D 2.2].)
2. Lift up the vehicle.
3. Remove the following parts:
- (1) Front under cover No.2 (2WD) (See FRONT UNDER COVER No.2 REMOVAL/INSTALLATION.)
-
- (2) Splash shield (See SPLASH SHIELD REMOVAL/INSTALLATION.)
-
- (3) Seal rubber (No.1) and noise suppression cover (No.1) (See TIMING CHAIN REMOVAL/INSTALLATION [SKYACTIV-D 2.2].)
-
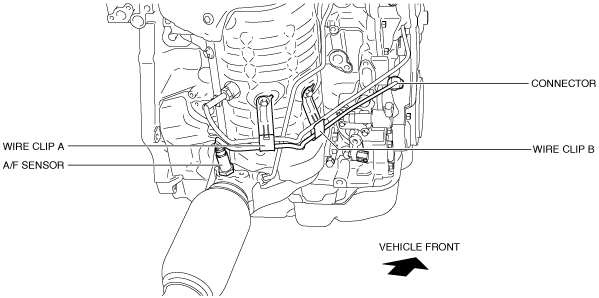
4. Disconnect the A/F sensor connector.
5. Remove the plate (exhaust system). (See EXHAUST SYSTEM REMOVAL/INSTALLATION [SKYACTIV-D 2.2].)
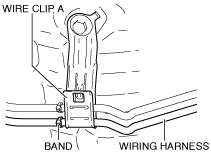
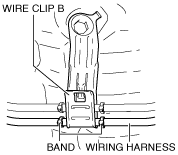
6. Remove the wiring harness from the wire clip A and B. (See Assembly of Wiring Harness to Wire Clip Note.)
7. Loosen the nuts (center bearing support) of the propeller shaft. (4WD) (See PROPELLER SHAFT REMOVAL/INSTALLATION.)
8. Disconnect the propeller shaft on the front side and set the propeller shaft onto the front crossmember. (4WD) (See PROPELLER SHAFT REMOVAL/INSTALLATION.)
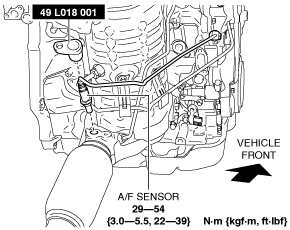
9. Remove the A/F sensor using the SST.
10. Install in the reverse order of removal.
11. Perform operation after replacing A/F sensor. (See Operation After Replacing A/F Sensor.)
Assembly of Wiring Harness to Wire Clip Note
-
• Secure the wiring harness to the wire clip A so that the band on the wiring harness is positioned to the left side of the wire clip A.
• Secure the wiring harness to the wire clip B so that the band on the wiring harness is positioned to the both sides of the wire clip B.