 |
ac5uuw00000320
4WD CONTROL MODULE REMOVAL/INSTALLATION
id031800806000
1. When replacing the 4WD control module, perform the configuration. (See 4WD CONTROL MODULE CONFIGURATION.)
2. Disconnect the negative battery cable. (See NEGATIVE BATTERY CABLE DISCONNECTION/CONNECTION [SKYACTIV-G 2.0, SKYACTIV-G 2.5].) (See NEGATIVE BATTERY CABLE DISCONNECTION/CONNECTION [SKYACTIV-G 2.0, SKYACTIV-G 2.5 (WITHOUT i-stop)].) (See NEGATIVE BATTERY CABLE DISCONNECTION/CONNECTION [SKYACTIV-D 2.2].)
3. Remove the front scuff plate. (See FRONT SCUFF PLATE REMOVAL/INSTALLATION.)
4. Remove the front side trim. (See FRONT SIDE TRIM REMOVAL/INSTALLATION.)
ac5uuw00000320
|
|
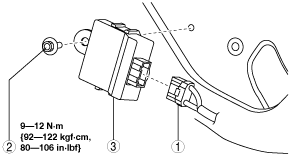
1
|
Connector
|
|
2
|
Bolt
|
|
3
|
4WD control module
|
5. Remove in the order indicated in the table.
6. Install in the reverse order of removal.
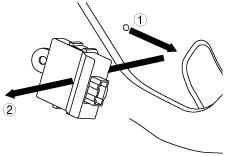
4WD Control module Removal Note
1. Slide the 4WD control module toward the connector, and remove it.
ac5uuw00000878
|