 |
acxaaw00000105
RADIATOR REMOVAL/INSTALLATION [L3 Turbo]
id0112b3801400
1. Disconnect the negative battery cable.
2. Drain the engine coolant. (See ENGINE COOLANT REPLACEMENT [L3 Turbo].)
3. Remove the charge air cooler duct, air cleaner and fresh air duct component. (See INTAKE-AIR SYSTEM REMOVAL/INSTALLATION [L3 Turbo].)
4. Remove the coolant reserve tank. (See COOLANT RESERVE TANK REMOVAL/INSTALLATION [L3 Turbo].)
5. Remove the dipstick pipe. (See OIL PAN REMOVAL/INSTALLATION [L3 Turbo].)
6. Disconnect the upper radiator hose. (See COOLING FAN COMPONENT REMOVAL/INSTALLATION [L3 Turbo].)
7. Remove the cooling fan component. (See COOLING FAN COMPONENT REMOVAL/INSTALLATION [L3 Turbo].)
8. Remove the under cover.
9. Disconnect the ATF oil cooler hose from the radiator.
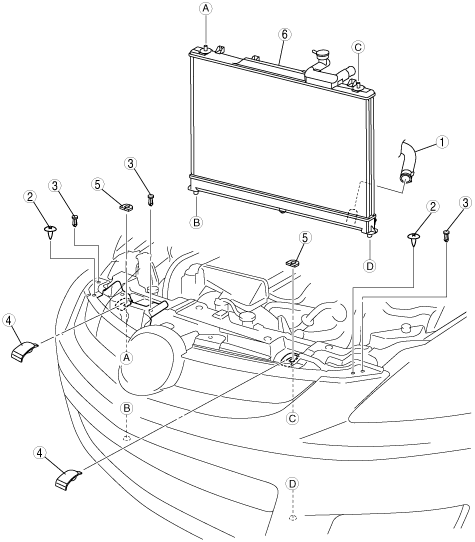
10. Remove in the order indicated in the table.
11. Install in the reverse order of the removal.
12. Refill the engine coolant. (See ENGINE COOLANT REPLACEMENT [L3 Turbo].)
13. Inspect for engine coolant leakage. (See ENGINE COOLANT LEAKAGE INSPECTION [L3 Turbo].)
14. Inspect the ATF level. (See AUTOMATIC TRANSAXLE FLUID (ATF) INSPECTION [AW6A-EL, AW6AX-EL].)
acxaaw00000105
|
|
1
|
Lower radiator hose
|
|
2
|
Screw
|
|
3
|
Duct clip
|
|
4
|
Upper mount rubber bracket
|
|
5
|
Upper mount rubber
|
|
6
|
Radiator
(See Radiator Removal Note.)
|
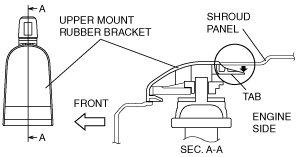
Upper Mount Rubber Bracket Removal Note
RH
1. Remove the upper mount rubber bracket while pressing down the upper mount rubber bracket tab in the direction of the arrow.
acxuuw00002013
|
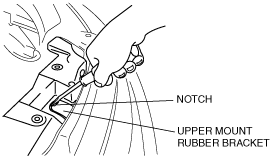
LH
1. Insert a flathead screwdriver into the upper mount rubber bracket notch.
acxuuw00002279
|
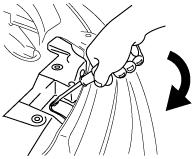
2. Apply force in the direction shown by the arrow.
acxuuw00002280
|
Radiator Removal Note
1. Remove the radiator from above the engine compartment.