 |
ac9wzw00003986
USB POWER OUTLET REMOVAL/INSTALLATION
id092100112100
6:4 Split Adjustable-type Bench Seat Type
1. Disconnect the negative battery terminal. (See NEGATIVE BATTERY TERMINAL DISCONNECTION/CONNECTION.)
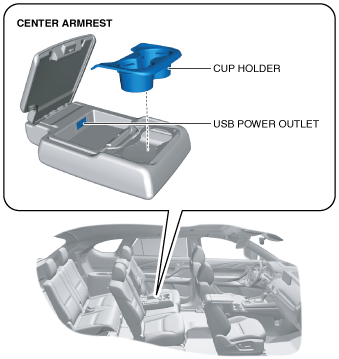
2. Remove the cup holder.
ac9wzw00003986
|
3. Lift up the tray in the direction of the arrow shown in the figure.
ac9wzw00003987
|
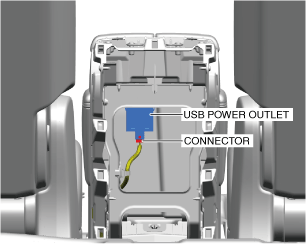
4. Disconnect the connector.
ac9uuw00005942
|
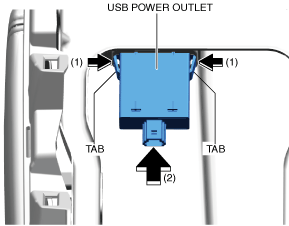
5. While pressing the tabs of the USB power outlet in the directions of arrows (1) shown in the figure, press out the USB power outlet in the direction of arrow (2) and detach the tabs of the USB power outlet from the tray.
ac9uuw00005943
|
6. Remove the USB power outlet.
7. Install in the reverse order of removal.
Captain Seat Type & Second-row Seat Console Type
1. Disconnect the negative battery terminal. (See NEGATIVE BATTERY TERMINAL DISCONNECTION/CONNECTION.)
2. Remove the second-row seat console panel. (See REAR CONSOLE REMOVAL/INSTALLATION.)
3. Disconnect the connector.
ac9wzw00005920
|
4. While pressing the tabs of the USB power outlet in the directions of arrows (1) shown in the figure, press out the USB power outlet in the direction of arrow (2) and detach the tabs of the USB power outlet from the second-row seat console box.
ac9wzw00005921
|
5. Remove the USB power outlet.
6. Install in the reverse order of removal.
Rear Console Panel (With Cup Holder)
1. Disconnect the negative battery terminal. (See NEGATIVE BATTERY TERMINAL DISCONNECTION/CONNECTION.)
2. Remove the rear console-up. (See REAR CONSOLE-UP REMOVAL/INSTALLATION.)
3. While pressing the tabs of the USB power outlet in the direction of the arrows (1) shown in the figure, press the USB power outlet in the direction of the arrow (2) to detach the tabs of the USB power outlet from the rear console-up.
ac8wzw00004305
|
4. Remove the USB power outlet.
5. Install in the reverse order of removal.
Trunk Side Trim
1. Disconnect the negative battery terminal. (See NEGATIVE BATTERY TERMINAL DISCONNECTION/CONNECTION.)
2. Remove the following parts:
3. While pressing the tabs of the USB power outlet in the direction of the arrows (1) shown in the figure, press the USB power outlet in the direction of the arrow (2) to detach the tabs of the USB power outlet from the trunk side trim.
ac8wzw00004143
|
4. Remove the USB power outlet.
5. Install in the reverse order of removal.