|
am6xuw00004164
TORQUE CONVERTER REMOVAL/INSTALLATION [AY6A-EL, AY6AX-EL]
id0517k3332300
1. Remove the transaxle. (See AUTOMATIC TRANSAXLE REMOVAL/INSTALLATION [AY6A-EL, AY6AX-EL].)
2. Clean the transaxle. (See AUTOMATIC TRANSAXLE CLEANING [AY6A-EL, AY6AX-EL].)
3. Remove the torque converter, and immediately turn it so that the hole faces upward. This will help to keep any remaining fluid from spilling.
am6xuw00004164
|
4. Drain any ATF remaining in the torque converter.
5. Using a flathead screwdriver, position the drive gear on the oil pump component in the center.
6. Install the torque converter to the transaxle.
am6xuw00004164
|
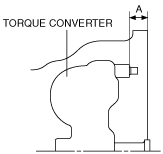
7. To ensure that the torque converter is installed accurately, measure distance A between the end of the torque converter and the end of the converter housing.
ac9uuw00003945
|
8. Install the transaxle. (See AUTOMATIC TRANSAXLE REMOVAL/INSTALLATION [AY6A-EL, AY6AX-EL].)
9. Add ATF. (See AUTOMATIC TRANSAXLE FLUID (ATF) LEVEL ADJUSTMENT [AY6A-EL, AY6AX-EL].)
10. Adjust the ATF level. (See AUTOMATIC TRANSAXLE FLUID (ATF) LEVEL ADJUSTMENT [AY6A-EL, AY6AX-EL].)
11. Perform the “MECHANICAL SYSTEM TEST”. (See MECHANICAL SYSTEM TEST [AY6A-EL, AY6AX-EL].)