|
ac9uuw00002158
OIL COOLER REMOVAL/INSTALLATION [MZI-3.7]
id0111e3800800
1. Disconnect the negative battery cable.
2. Drain the engine coolant. (See ENGINE COOLANT REPLACEMENT [MZI-3.7].)
3. Remove the air cleaner and fresh air duct component. (See INTAKE-AIR SYSTEM REMOVAL/INSTALLATION [MZI-3.7].)
4. Remove the cooling fan component. (See COOLING FAN COMPONENT REMOVAL/INSTALLATION [MZI-3.7].)
5. Remove the exhaust manifold insulator (LH). (See EXHAUST SYSTEM REMOVAL/INSTALLATION [MZI-3.7].)
6. Remove in the order indicated in the table.
7. Use a clean rag to wipe off the mounting surface on the oil filter adapter and the oil cooler.
8. Install in the reverse order of the removal.
9. Refill the engine coolant. (See ENGINE COOLANT REPLACEMENT [MZI-3.7].)
10. Start the engine and confirm that there is no oil leakage.
11. Inspect the oil level. (See ENGINE OIL LEVEL INSPECTION [MZI-3.7].)
12. Inspect for engine coolant leakage. (See ENGINE COOLANT LEAKAGE INSPECTION [MZI-3.7].)
ac9uuw00002158
|
|
1
|
Water hose
|
|
2
|
Oil cooler
(See Oil Cooler Installation Note.)
|
|
3
|
O-ring
|
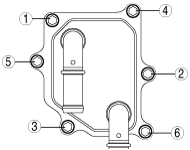
Oil Cooler Installation Note
1. Tighten the oil cooler bolts in the order shown in the figure.
ac9uuw00002159
|