|
ac9uuw00001967
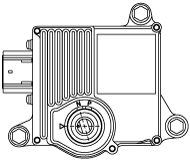
TCM REMOVAL/INSTALLATION [AW6AX-EL]
id0517j6800400
1. Disconnect the negative battery cable.
2. Remove the air cleaner component. (See INTAKE-AIR SYSTEM REMOVAL/INSTALLATION [MZI-3.7].)
3. Disconnect the TCM connector.
4. Remove the clip and disconnect the selector cable.
ac9uuw00001967
|
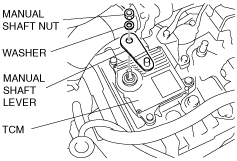
5. Set the adjustable wrench as shown in the figure to hold the manual shaft lever.
ac9uuw00001968
|
6. Remove the manual shaft nut and washer.
ac9uuw00001969
|
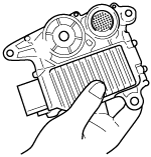
7. Remove the TCM.
ac9uuw00001970
|
ac9uuw00001971
|
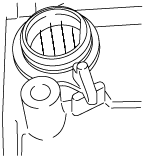
8. Inspect the condition of the connector pin of the coupler component (foreign material, bent pins, broken pins) and O-ring after the TCM is removed.
ac9uuw00001972
|
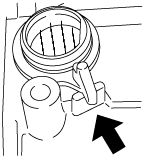
9. Align the transaxle case and coupler component connector.
ac9uuw00001973
|
10. Be sure to match the position of the TCM marking.
ac9uuw00001974
|
11. Install the TCM.
12. Verify the correct positioning of the TCM and coupler component.
ac9uuw00001975
|
13. Tighten the TCM mounting bolts.
14. Install the manual shaft lever and the washer.
ac9uuw00001969
|
15. Set the adjustable wrench as shown in the figure to hold the manual shaft lever, and tighten the manual shaft nut.
ac9uuw00001968
|
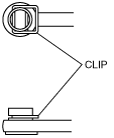
16. Install the clip to the selector cable as shown in the figure.
ac9uuw00001976
|
17. Shift the selector lever to P position.
18. Turn the manual shaft lever to P position.
19. Connect the selector cable and install the clip.
ac9uuw00001967
|
20. Connect the TCM connector.
21. Install the air cleaner component. (See INTAKE-AIR SYSTEM REMOVAL/INSTALLATION [MZI-3.7].)
22. Connect the negative battery cable.
23. Perform the neutral position learning. (See Neutral Position Learning.)
Neutral Position Learning
1. Engage the parking brake and use wheel chocks at the front and rear of the wheels.
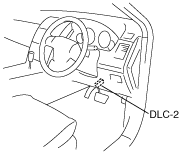
2. Connect the M-MDS to the DLC-2.
L.H.D.
ac9uuw00001977
|
R.H.D.
ac9wzw00000010
|
3. After the vehicle is identified, select the following items from the initialization screen of the M-MDS.
4. Then, select the “Transmission Learning”.
5. Perform the N range learning according to the directions on the screen.
6. Shift the selector lever from P position to D range, then verify that the positions of the selector lever and the indicator are aligned.