 |
ac9uuw00001048
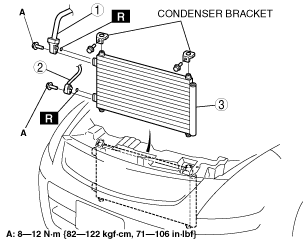
CONDENSER REMOVAL/INSTALLATION
id071100801200
1. Disconnect the negative battery cable.
2. Discharge the refrigerant. (See REFRIGERANT CHARGING.)
3. Drain the engine coolant. (See ENGINE COOLANT REPLACEMENT [MZI-3.7].)
4. Remove the air cleaner and fresh air duct component. (See INTAKE-AIR SYSTEM REMOVAL/INSTALLATION [MZI-3.7].)
5. Remove the cooling fan component. (See FAN MOTOR INSPECTION [MZI-3.7].)
6. Disconnect the ATF oil cooler hose from the radiator.
7. Remove the radiator. (See RADIATOR REMOVAL/INSTALLATION [MZI-3.7].)
8. Remove the nut and disconnect front cooler pipes No.3 and No.4. (See REFRIGERANT LINE REMOVAL/INSTALLATION.)
9. Remove the front cooler pipe No.3 bracket. (See REFRIGERANT LINE REMOVAL/INSTALLATION.)
10. Remove the bolts and two condenser brackets.
11. Remove in the order indicated in the table. Do not allow remaining compressor oil in the refrigerant line to spill.
ac9uuw00001048
|
|
1
|
Front cooler hose (HI)
|
|
2
|
Front cooler pipe No.3
|
|
3
|
Condenser
|
12. Install in the reverse order of removal. (See Condenser Installation Note.)
13. Refill the engine coolant. (See ENGINE COOLANT REPLACEMENT [MZI-3.7].)
14. Inspect for engine coolant leakage. (See ENGINE COOLANT LEAKAGE INSPECTION [MZI-3.7].)
15. Inspect the ATF level. (See AUTOMATIC TRANSAXLE FLUID (ATF) INSPECTION [AW6AX-EL].)
16. Perform the refrigerant system performance test. (See REFRIGERANT SYSTEM PERFORMANCE TEST.)
Condenser Installation Note
1. When installing a new condenser, add a supplemental amount of DENSO OIL8 compressor oil into the refrigerant cycle.