 |
ac9wzw00000776
DIAGNOSTIC ASSIST FUNCTION [CAR-NAVIGATION SYSTEM]
id0902f7361100
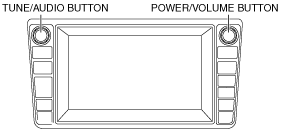
Starting Procedure
1. Turn the ignition switch to the ACC or ON position.
2. Turn the audio power to ON.
3. While pressing the POWER/VOLUME button, simultaneously press the TUNE/AUDIO button for 1 s or more.
ac9wzw00000776
|
4. Press the “Diagnostic assist code input switch”, and input the diagnostic assist code.
5. Select “ENTER”.
6. Press the POWER/VOLUME button to return to the diagnostic assist code input screen.
7. Press the POWER/VOLUME button to release the diagnostic assist function.
Diagnostic assist code input screen
am6zzw00002786
|
|
No. |
Name |
Content/function |
|---|---|---|
|
1
|
Diagnostic assist code
|
Display the diagnostic assist code.
|
|
2
|
Diagnostic assist code input switch
|
Input the diagnostic assist code.
|
|
3
|
DEL
|
Clear the diagnostic assist code.
|
|
4
|
Diagnostic content
|
Display the diagnostic content.
|
|
5
|
ENTER
|
Go to the diagnostic assist function.
|
Diagnostic assist code table
|
No. |
Content/function |
|---|---|
|
01
|
|
|
02
|
|
|
03
|
|
|
04
|
|
|
05
|
|
|
06
|
|
|
07
|
|
|
08
|
|
|
09
|
|
|
10
|
|
|
11
|
Diagnostic assist code “01” display inspection
1. Press the “Diagnostic assist code input switch”, and input the diagnostic assist code “01”.
2. Select “ENTER”.
|
Inspection |
Display |
Action |
|
|---|---|---|---|
|
• Launch the display inspection mode.
• Verify the display.
|
Red→Green→Blue→White→Black→Color bar→Grey bar→Position adjustment screen
|
The display displays normally.
|
The display is normal.
|
|
The display does not display normally.
|
Replace the car-navigation unit.
|
||
3. Press the POWER/VOLUME button to return to the diagnostic assist code input screen.
4. Press the POWER/VOLUME button to release the diagnostic assist function.
Diagnostic assist code “02” switch inspection
1. Press the “Diagnostic assist code input switch”, and input the diagnostic assist code “02”.
2. Select “ENTER”.
|
Inspection |
Display |
Action |
|
|---|---|---|---|
|
• Launch the switch inspection mode.
• Operate all of the buttons (press).
• Does the buzzer sound?
|
—
|
Yes
|
The button is normal.
|
|
No
|
Replace the car-navigation unit.
|
||
3. Press the POWER/VOLUME button to return to the diagnostic assist code input screen.
4. Press the POWER/VOLUME button to release the diagnostic assist function.
Diagnostic assist code “03” speaker inspection
1. Refer to “SPEAKER CONNECTION INSPECTION [WITH Bose®]”.
Diagnostic assist code “04” radio reception condition inspection
1. Launch the diagnostic assist function with the radio power on and the radio receiving broadcasts. (See Starting Procedure.)
2. Press the “Diagnostic assist code input switch”, and input the diagnostic assist code “04”.
3. Select “ENTER”.
4. Inspect according to the following table:
|
Inspection |
Display (AM 522 kHz reception) |
Action |
|---|---|---|
|
Start the radio reception condition inspection mode.
|
LEV-10 522 ↔ LEV 5 522
|
Glass antenna, antenna feeder and car-navigation unit are normal.
|
|
LEV-4 522 ↔ LEV 3 522
|
Change frequencies and re-perform the inspection.
|
|
|
LEV-2 522 ↔ LEV 0 522
|
Inspect the glass antenna, antenna feeder.
|
5. Press the POWER/VOLUME button to return to the diagnostic assist code input screen.
6. Press the POWER/VOLUME button to release the diagnostic assist function.
Diagnostic assist code “05” antenna control output condition inspection
1. Launch the diagnostic assist function with the radio power on and the radio receiving broadcasts. (See Starting Procedure.)
2. Press the “Diagnostic assist code input switch”, and input the diagnostic assist code “05”.
3. Select “ENTER”.
4. Inspect according to the following table:
|
Inspection |
Display |
Action |
|
|---|---|---|---|
|
Start antenna control condition inspection mode.
|
ANT-ON
|
Sound quality good.
|
System is okay.
|
|
Sound quality poor.
|
|||
|
ANT-OFF
|
Replace the car-navigation unit.
|
||
5. Press the POWER/VOLUME button to return to the diagnostic assist code input screen.
6. Press the POWER/VOLUME button to release the diagnostic assist function.
Diagnostic assist code “06” supplier identification
1. Refer to “SUPPLIER IDENTIFICATION PROCEDURE [CAR-NAVIGATION SYSTEM]”.
Diagnostic assist code “07” audio amplifier specification inspection
1. Press the “Diagnostic assist code input switch”, and input the diagnostic assist code “07”.
2. Select “ENTER”.
|
Inspection |
Display |
Action |
|
|---|---|---|---|
|
• Launch the audio amplifier specification inspection mode.
• Verify the audio amplifier specification.
• Does the audio amplifier specification correspond?
|
Without Bose®
• N
With Bose®
• L
|
Yes
|
System is okay.
|
|
No
|
Replace the car-navigation unit.
|
||
3. Press the POWER/VOLUME button to return to the diagnostic assist code input screen.
4. Press the POWER/VOLUME button to release the diagnostic assist function.
Diagnostic assist code “08” display open/close inspection
1. Press the “Diagnostic assist code input switch”, and input the diagnostic assist code “08”.
2. Select “ENTER”.
|
Inspection |
Display |
Action |
|
|---|---|---|---|
|
• Launch the audio display open/close inspection mode.
• Does the display open/close in the following order?
|
—
|
Yes
|
System is okay.
|
|
No
|
Replace the car-navigation unit.
|
||
3. Press the POWER/VOLUME button to return to the diagnostic assist code input screen.
4. Press the POWER/VOLUME button to release the diagnostic assist function.
Diagnostic assist code “09” radio SEEK inspection
1. Launch the diagnostic assist function with the radio power on and the radio receiving broadcasts. (See Starting Procedure.)
2. Press the “Diagnostic assist code input switch”, and input the diagnostic assist code “09”.
3. Select “ENTER”.
|
Inspection |
Display |
Action |
|
|---|---|---|---|
|
• Launch the radio SEEK inspection mode.
• Verify the SEEK inspection to the directions on the screen.
• Is the inspection result normal?
|
—ch RECEIVED
|
Yes
|
System is okay.
|
|
No
|
Inspect the glass antenna, antenna feeder.
|
||
4. Press the POWER/VOLUME button to return to the diagnostic assist code input screen.
5. Press the POWER/VOLUME button to release the diagnostic assist function.
Diagnostic assist code “10” software version verification
1. Press the “Diagnostic assist code input switch”, and input the diagnostic assist code “10”.
2. Select “ENTER”.
3. Verify the software version.
|
Inspection |
Display |
Action |
|
|---|---|---|---|
|
• Launch the software version verification mode.
• Verify the software version.
|
Display the software version.
|
—
|
|
4. Press the POWER/VOLUME button to return to the diagnostic assist code input screen.
5. Press the POWER/VOLUME button to release the diagnostic assist function.
Diagnostic assist code “11” DVD/CD drive inspection
1. Press the “Diagnostic assist code input switch”, and input the diagnostic assist code “11”.
2. Select “ENTER”.
|
Inspection |
Display |
Action |
|
|---|---|---|---|
|
• Launch the DVD/CD drive inspection mode.
• Insert the DVD or CD.
• Is the inspection result normal?
|
USER DISC DEFECT
|
Yes
|
System is okay.
|
|
CD-DRIVE MALFUNCTION
|
No
|
Replace the car-navigation unit.
|
|
3. Press the POWER/VOLUME button to return to the diagnostic assist code input screen.
4. Press the POWER/VOLUME button to release the diagnostic assist function.
