INSTRUMENT CLUSTER REMOVAL/INSTALLATION
id092200800500
-
Caution
-
• When replacing the instrument cluster, the configuration procedure must be performed before removing the instrument cluster. Replacing the instrument cluster without performing the configuration procedure will result in system malfunction.
1. Perform the instrument cluster configuration when replacing it. (See INSTRUMENT CLUSTER CONFIGURATION.)
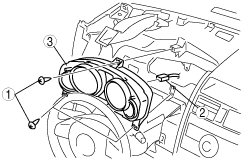
2. Disconnect the negative battery cable.
3. Remove the following parts:
- (1) Decoration panel (See DECORATION PANEL REMOVAL/INSTALLATION.)
- (2) Front console box mat (See FRONT CONSOLE BOX MAT REMOVAL/INSTALLATION.)
- (3) Indicator panel (See INDICATOR PANEL REMOVAL/INSTALLATION.)
- (4) Front console box (See FRONT CONSOLE BOX REMOVAL/INSTALLATION.)
- (5) Center panel (See CENTER PANEL REMOVAL/INSTALLATION.)
- (6) Upper column cover (See COLUMN COVER REMOVAL/INSTALLATION.)
- (7) Meter hood (See METER HOOD REMOVAL/INSTALLATION.)
4. Remove in the order indicated in the table.
|
1
|
Screw
|
|
2
|
Connector
|
|
3
|
Instrument cluster
|
5. Install in the reverse order of removal.
6. Perform programming of immobilizer system-related parts. (With keyless entry system) (See IMMOBILIZER SYSTEM COMPONENT REPLACEMENT/KEY ADDITION AND CLEARING [KEYLESS ENTRY SYSTEM].)
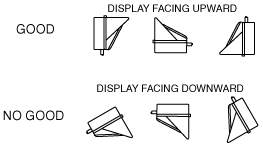
-
Caution
-
• The removed instrument cluster should be placed with the display side up to prevent grease from leaking from the meters.