 |
ac9wzw00000822
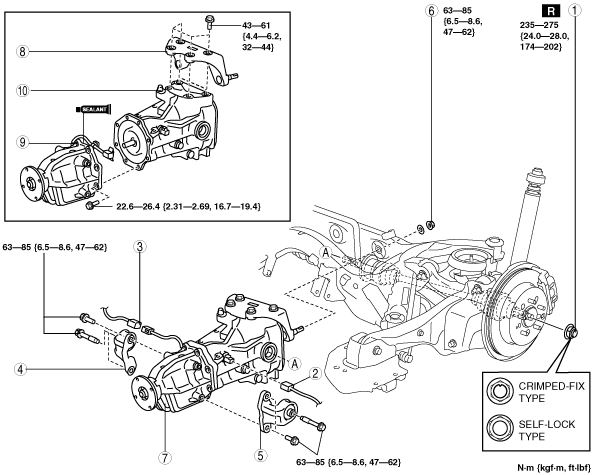
REAR DIFFERENTIAL REMOVAL/INSTALLATION
id031400800400
1. Drain the rear differential oil into a container.
2. Remove the under guard (LH). (See CHARCOAL CANISTER, CANISTER VENT (CV) SOLENOID VALVE, AIR FILTER COMPONENT REMOVAL/INSTALLATION [MZI-3.7].)
3. Remove the presilencer. (See EXHAUST SYSTEM REMOVAL/INSTALLATION [MZI-3.7].)
4. Remove the presilencer insulator. (See REFRIGERANT LINE REMOVAL/INSTALLATION.)
5. Remove the propeller shaft. (See PROPELLER SHAFT REMOVAL/INSTALLATION.)
6. Remove in the order indicated in the table.
7. Install in the reverse order of removal.
8. Add the specified rear differential oil. (See DIFFERENTIAL OIL REPLACEMENT.)
9. Inspect the rear wheel alignment and adjust it if necessary. (See REAR WHEEL ALIGNMENT [4WD].)
ac9wzw00000822
|
|
1
|
Locknut (crimped-fix type)/Locknut (self-lock type)
|
|
2
|
Differential oil temperature sensor connector
|
|
3
|
4WD solenoid connector
|
|
4
|
Front differential mounting rubber (RH)
|
|
5
|
Front differential mounting rubber (LH)
|
|
6
|
Nut
|
|
7
|
Rear differential component
|
|
8
|
Rear differential mounting rubber
|
|
9
|
Coupling component
|
|
10
|
Rear differential
|
Locknut (Crimped-fix Type) Removal Note
1. Lock the hub by applying the brakes.
2. Knock the crimped portion of the locknut outward using a small chisel and a hammer.
ampjjw00004289
|
3. Loosen the locknut.
4. Temporarily tighten the locknut.
Rear Differential Component Removal Note
1. Detach clips as shown in the figure.
ac9uuw00001446
|
2. Position the SST on the driveshaft and secure the SST with tape as shown in the figure.
ac9uuw00001531
|
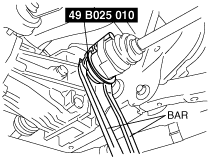
3. Disconnect the rear drive shaft from the rear differential side using the SST and two bars.
ac9uuw00001532
|
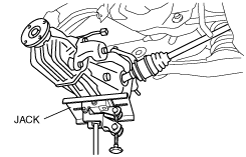
4. Support the rear differential using a jack.
ac9uuw00001448
|
5. Remove the rear drive shaft from the rear differential while lowering the rear differential gradually.
ac9uuw00001449
|
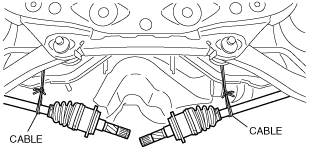
6. Suspend the drive shaft using a cable.
ac9uuw00001723
|
Rear Differential Component installation Note
1. Install the rear drive shaft to the rear differential while raising the rear differential gradually.
ac9uuw00001449
|
2. Jack up the rear drive shaft until it is horizontal and engage the rear drive shaft (differential side) and rear differential by tapping the wheel side.