 |
ac9wzw00002794
REFRIGERANT LINE REMOVAL/INSTALLATION
id071100803000
1. Disconnect the negative battery cable.
2. Discharge the refrigerant. (See REFRIGERANT CHARGING.)
3. Drain the engine coolant. (See ENGINE COOLANT REPLACEMENT [MZI-3.7].)
4. Drain the power steering fluid. (R.H.D.) (See POWER STEERING FLUID INSPECTION.)
5. Remove the following parts: (L.H.D.)
6. Remove the following parts: (R.H.D.)
7. Disconnect the ATF oil cooler hose from the radiator.
8. Remove the radiator. (See RADIATOR REMOVAL/INSTALLATION [MZI-3.7].)
9. Remove the condenser. (See CONDENSER REMOVAL/INSTALLATION.)
10. Remove the coolant reserve tank retaining bolts and move the coolant reserve tank.
11. Remove the power steering oil pump retaining bolt and nut and move the power steering oil pump. (See POWER STEERING OIL PUMP REMOVAL/INSTALLATION [L.H.D.].) (See POWER STEERING OIL PUMP REMOVAL/INSTALLATION [R.H.D.].)
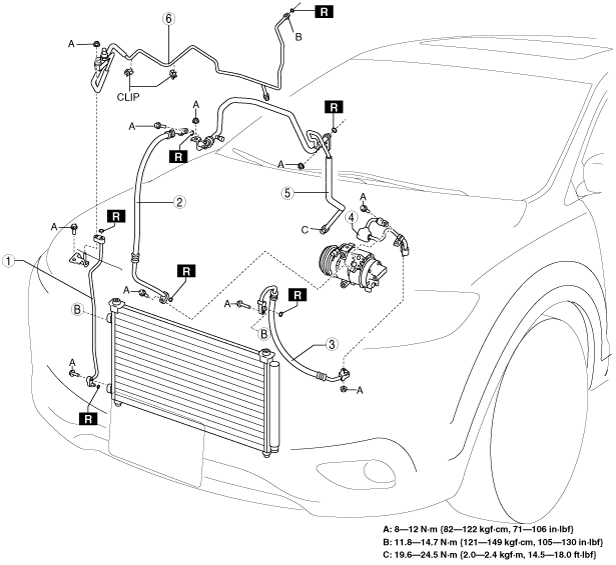
12. Do not allow remaining compressor oil in the piping and connecting parts to spill, and remove in the order indicated in the table.
R.H.D.
ac9wzw00002794
|
L.H.D.
ac9wzw00002795
|
|
1
|
Front cooler pipe No.3
|
|
2
|
Front cooler hose (LO)
|
|
3
|
Front cooler hose (HI)
|
|
4
|
Front cooler pipe No.2
|
|
5
|
Front cooler pipe No.1
|
|
6
|
Front cooler pipe No.4
|
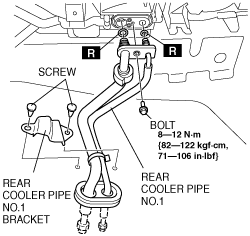
13. Remove the following parts, depending on rear cooler pipe to be removed.
ac9wzw00000921
|
14. Jack up the vehicle.
15. Remove the nuts and disconnect the presilencer and middle pipe.
ac9wzw00002796
|
16. Disconnect the rubber hanger.
17. Remove the bolts and presilencer insulator.
18. Remove the bolts.
19. Remove the nut and fastener.
20. Remove the under guard (RH).
21. Remove the transverse member retaining bolts and set the transverse member out of the way. (See TRANSVERSE MEMBER REMOVAL/INSTALLATION.)
22. Remove the bolt.
ac9uuw00002767
|
23. Remove the clip.
24. Disconnect rear cooler pipe No.1 and remove rear cooler pipes No.2 and No.1.
25. Install in the reverse order of removal.
26. Inspect for engine coolant leakage. (See ENGINE COOLANT LEAKAGE INSPECTION [MZI-3.7].)
27. Inspect the ATF level. (See AUTOMATIC TRANSAXLE FLUID (ATF) INSPECTION [AY6A-EL, AY6AX-EL].)
28. Perform the refrigerant system performance test. (See REFRIGERANT SYSTEM PERFORMANCE TEST.)
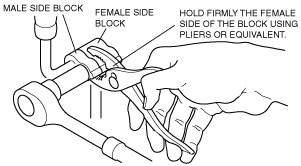
Refrigerant Line Removal Note
Block joint type
1. Disconnect the block joint type pipes by grasping the female side of the block with pliers or similar tool and holding firmly, and then remove the connection bolt or nut.
am8rrw00000760
|
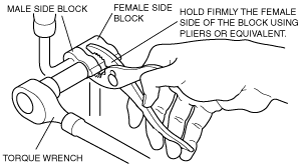
Refrigerant Line Installation Note (1)
1. Temporarily tighten the joint bolt by hand.
2. Connect the block joint type pipes by grasping the female side of the block with pliers or similar tool and holding firmly, and then tighten the connection bolt or nut with a torque wrench.
am8rrw00000763
|
Refrigerant Line Installation Note (2)
1. When installing a new cooler pipe or cooler hose, add a supplemental amount of DENSO OIL8 compressor oil into the refrigeration cycle.