 |
am3zzw00024262
DRIVE BELT REMOVAL/INSTALLATION [SKYACTIV-G 2.0]
id0110h2950100
Integrated Starter Generator (ISG) Drive Belt Removal/Installation
1. Turn the steering wheel completely to the right.
2. Remove the front splash shield (RH). (See SPLASH SHIELD REMOVAL/INSTALLATION.)
3. Remove the decoupling ring tensioner. (See DECOUPLING RING TENSIONER REMOVAL/INSTALLATION [SKYACTIV-G 2.0].)
4. Remove the integrated starter generator (ISG) drive belt.
5. Install the integrated starter generator (ISG) drive belt.
6. Install the decoupling ring tensioner. (See DECOUPLING RING TENSIONER REMOVAL/INSTALLATION [SKYACTIV-G 2.0].)
7. Rotate the crankshaft pulley clockwise approx. a half a turn and verify that the integrated starter generator (ISG) drive belt is installed correctly.
8. Verify that the decoupling ring tensioner indicator is in the normal range. (See DRIVE BELT INSPECTION [SKYACTIV-G 2.0].)
9. Install the front splash shield (RH). (See SPLASH SHIELD REMOVAL/INSTALLATION.)
10. Return the steering wheel to the original position.
Water Pump Drive Belt
Removal
1. Remove the integrated starter generator (ISG) drive belt. (See Integrated Starter Generator (ISG) Drive Belt Removal/Installation.)
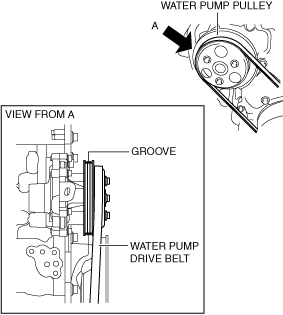
2. Apply a clean cloth to the water pump drive belt as shown in the figure.
am3zzw00024262
|
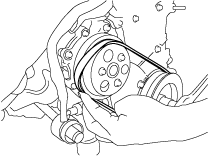
3. Pull the cloth in the direction of the arrow and rotate the crankshaft pulley clockwise.
am3zzw00024263
|
4. Remove the water pump drive belt.
Installation
1. Set one side of the water pump drive belt into the groove of the crankshaft pulley.
2. Set the other side of the water pump drive belt into the groove of the water pump pulley with the smaller circumference.
am3zzw00024264
|
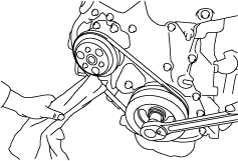
3. Press the drive belt up from the smaller circumference pulley into the groove of the larger circumference pulley, and rotate the crankshaft pulley clockwise.
am3zzw00024265
|
4. After drive belt installation, rotate the crankshaft pulley clockwise approx. a half a turn and verify that the water pump drive belt is installed correctly.
5. Install the integrated starter generator (ISG) drive belt. (See Integrated Starter Generator (ISG) Drive Belt Removal/Installation.)