AUTOMATIC TRANSAXLE FLUID (ATF) ADJUSTMENT [ET6A-EL, ET6AX-EL]
id0517n3119300
Oil and Chemical Type
-
Caution
-
• Only adjust the ATF level when the ATF temperature is 45—55 °C {113—131 °F}. If the ATF level is incorrect, it could damage the transaxle.
• Do not add ATF over the specification. Otherwise, the transaxle performance could be reduced and ATF could leak.
1. Remove the front under cover No.2. (See FRONT UNDER COVER No.2 REMOVAL/INSTALLATION.)
2. Remove the front under cover No.1. (See FRONT UNDER COVER No.1 REMOVAL/INSTALLATION.)
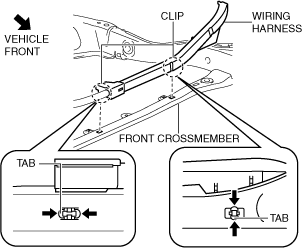
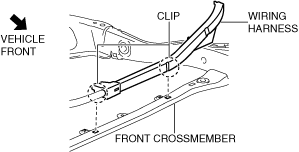
3. Disconnect the wiring harness from the front crossmember.
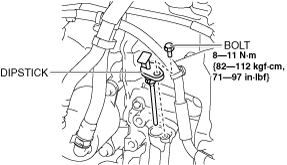
4. Remove the dipstick securing bolt.
5. Adjust the ATF level.
- (1) Access the following PIDs using the M-MDS. (See PID/DATA MONITOR INSPECTION.) (See PID/DATA MONITOR TABLE [TCM (ET6A-EL, ET6AX-EL)].)
-
-
TCM
-
• TFT (ATF temperature)
- (2) Warm up the engine until the ATF temperature is 50 °C {122 °F}.
-
- (3) Remove the dipstick and wipe the ATF off using a clean cloth while leaving the engine idling.
-
-
Warning
-
• Keep hands and tools away from the cooling fan even if the cooling fan is not operating to prevent injury, or damage to the cooling fan.
• Do not touch parts which have become heated. Otherwise, it could cause severe burns or serious injury.
- (4) Insert the dipstick and pull it out again.
-
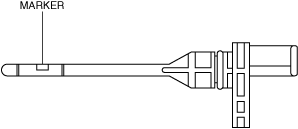
- (5) Verify that ATF is adhering to the central marker area on the dipstick.
-
-
• If ATF is not adhering to the central marker area on the dipstick, adjust the ATF level to the central marker area.
-
Note
-
• The ATF color is blue.
• Only use ATF FZ.
6. Insert the dipstick and install the securing bolt.
7. Connect the wiring harness to the front crossmember.
8. Install the front under cover No.1. (See FRONT UNDER COVER No.1 REMOVAL/INSTALLATION.)
9. Install the front under cover No.2. (See FRONT UNDER COVER No.2 REMOVAL/INSTALLATION.)