 |
a30zzw00006232
EXPANSION VALVE REMOVAL/INSTALLATION
id071100704500
Replacement Part
|
O-ring (expansion valve)
Quantity: 2
Location of use: expansion valve
|
Oil and chemical type
|
Refrigerant
HFC-134a(R-134a)
|
1. Disconnect the negative battery terminal. (See NEGATIVE BATTERY TERMINAL DISCONNECTION/CONNECTION.)
2. Discharge the refrigerant. (See REFRIGERANT RECOVERY.) (See REFRIGERANT CHARGING.)
3. Plug hole plate (See PLUG HOLE PLATE REMOVAL/INSTALLATION [SKYACTIV-G 2.0].)
4. Disconnect the front cooler pipe and front cooler hose (LO). Do not allow compressor oil to spill. (See REFRIGERANT LINE REMOVAL/INSTALLATION.)
5. Set the cooler hose (LO) and cooler pipe aside while being careful not to let remaining oil in the pipes to spill.
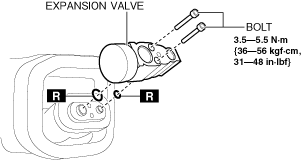
6. Remove the bolts.
a30zzw00006232
|
7. Remove the expansion valve. Do not allow compressor oil to spill.
8. Install in the reverse order of removal.
9. Charge the refrigerant. (See REFRIGERANT CHARGING.)
10. Perform the air-conditioning system performance test. (See REFRIGERANT SYSTEM PERFORMANCE TEST.)