 |
a30zzw00006446
REFRIGERANT PRESSURE SENSOR No.1 REMOVAL/INSTALLATION
id074000704000
Replacement Part
|
O-ring
Quantity: 1
Location of use: Refrigerant pressure sensor No.1
|
Oil and chemical type
|
Refrigerant
Type: HFC-134a (R-134a)
|
Compressor oil
Type: FD46XG
|
1. Disconnect the negative battery terminal. (See NEGATIVE BATTERY TERMINAL DISCONNECTION/CONNECTION.)
2. Discharge the refrigerant. (See REFRIGERANT RECOVERY.)
3. Remove the plug hole plate. (See PLUG HOLE PLATE REMOVAL/INSTALLATION [SKYACTIV-G 2.0].)
4. Remove the cooler pipe. (See REFRIGERANT LINE REMOVAL/INSTALLATION.)
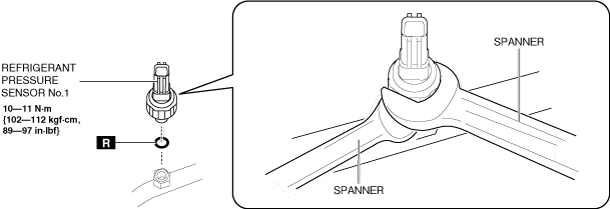
5. Loosen the refrigerant pressure sensor No.1 using two spanners.
a30zzw00006446
|
6. Remove the refrigerant pressure sensor No.1. (See Refrigerant pressure sensor No.1 installation note.)
7. Install in the reverse order of removal.
8. Charge the refrigerant. (See REFRIGERANT CHARGING.)
9. Perform the air-conditioning system performance test. (See REFRIGERANT SYSTEM PERFORMANCE TEST.)
Refrigerant pressure sensor No.1 installation note
1. Apply compressor oil to the O-rings and connect the joints.