REAR WINDOW GLASS INSTALLATION
id091200701000
Replacement parts
|
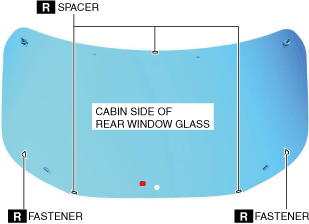
Spacer (When reusing rear window glass)
Quantity: 3
Location of use: Rear window glass
|
Fastener (When reusing rear window glass)
Quantity: 2
Location of use: Rear window glass
|
Fasteners
Quantity: 2
Location of use: Liftgate panel
|
-
Warning
-
• Using a utility knife with bare hands can cause injury. Always wear gloves when using a utility knife.
-
Caution
-
• If a door is opened or closed when all the door glass is fully closed, the resulting change in air pressure could cause the sealant to crack preventing the proper installation of the rear window glass. Keep the door glass open until the rear window glass installation is completed.
1. Remove the sealant along the perimeter of the rear window glass side using a utility knife. (When reusing rear window glass)
2. Inspect the rear window glass for cracks. If it is cracked, chamfer the edges of the rear window glass using sandpaper.
3. Clean then degrease along the perimeter of the bonding area on the rear window glass.
4. Align the spacer and fastener to the alignment mark and affix them. (When reusing rear window glass)
-
Caution
-
• To prevent weakening of the primer adhesion, keep the bonding surface free of dirt, moisture, and grease. Do not touch the surface with your hand.
5. Apply primer to the rear window glass in the area of the glass shown in the figure.
-
• Follow the primer product instructions for the drying time.
-
Note
-
• Apply primer to the hollowed marks in the ceramic coating.
6. Cut away the old sealant using a utility knife or scraper so that a 1—2 mm {0.04—0.07 in} thickness of sealant remains along the perimeter on the liftgate panel side.
7. Clean, then degrease along the perimeter of the bonding area on the liftgate panel.
-
Caution
-
• To prevent weakening of the primer adhesion, keep the bonding surface free of dirt, moisture, and grease. Do not touch the surface with your hand.
8. Apply primer to the liftgate panel in the area shown in the figure.
-
• Follow the primer product instructions for the drying time.
9. Install the fastener at the position shown in the figure.
10. Install the outer bushing. (See REAR WIPER MOTOR REMOVAL/INSTALLATION.)
11. Apply sealant to the rear window glass surface as shown in the figure.
-
Note
-
• When reusing the rear window glass, align the rear window glass with the alignment mark and install.
12. Install the rear window glass.
13. Connect the connectors.
14. Install the following parts.
- (1) Glass antenna terminal cover (See ANTENNA FEEDER NO.2 REMOVAL/INSTALLATION.)
-
- (2) Rear wiper motor (See REAR WIPER MOTOR REMOVAL/INSTALLATION.)
-
- (3) Rear wiper arm and blade (See REAR WIPER ARM AND BLADE REMOVAL/INSTALLATION.)
-
- (4) Rear finisher (See REAR FINISHER REMOVAL/INSTALLATION.)
-
- (5) Rear spoiler (See REAR SPOILER INSTALLATION.)
-
- (6) Side spoiler (See SIDE SPOILER REMOVAL/INSTALLATION.)
-
- (7) Liftgate lower trim (See LIFTGATE LOWER TRIM REMOVAL/INSTALLATION.)
-
- (8) Door lock switch (liftgate) (With door lock switch (liftgate)) (See DOOR LOCK SWITCH REMOVAL/INSTALLATION.)
-
- (9) Liftgate recess (See LIFTGATE RECESS REMOVAL/INSTALLATION.)
-
- (10) Liftgate side trim (See LIFTGATE SIDE TRIM REMOVAL/INSTALLATION.)
-
- (11) Liftgate upper trim (See LIFTGATE UPPER TRIM REMOVAL/INSTALLATION.)
-
15. Connect the negative battery terminal. (See NEGATIVE BATTERY TERMINAL DISCONNECTION/CONNECTION.)
16. Allow the sealant to harden completely.
Reference for sealant hardening time: 24 h
-
Note
-
• Follow the product instructions for the sealant hardening time.
