FUEL-FILLER LID OPENER CABLE REMOVAL/INSTALLATION
id091400203600
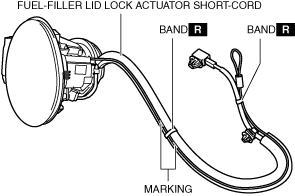
Replacement Part
|
Band
Quantity: 2
Location of use: Fuel-filler lid opener cable
|
-
Warning
-
• Fuel vapor is hazardous. It can very easily ignite, causing serious injury and damage. Always keep sparks and flames away from fuel.
• Highly pressurized fuel may spray out if the fuel line is cut. Due to the following dangers occurring with a fuel spray, always complete the [Fuel Line Safety Procedure] to prevent the fuel from spraying.
-
― Fuel may cause irritation if it comes in contact with skin and eyes.
― If fuel ignites and causes a fire, it may lead to serious injury or death, and damage to property and facilities.
• A person charged with static electricity could cause a fire or explosion, resulting in death or serious injury. Before performing work on the fuel system, discharge static electricity by touching the vehicle body.
1. Level the vehicle.
2. Complete the [BEFORE SERVICE PRECAUTION]. (See BEFORE SERVICE PRECAUTION [SKYACTIV-G 2.0].)
3. Drain the fuel. (See FUEL DRAINING PROCEDURE [SKYACTIV-G 2.0].)
4. Open the fuel-filler lid.
-
Note
-
• If the fuel-filler lid cannot be opened due to a discharged battery or malfunctions in the electrical system, open the fuel-filler lid referring to the [FUEL-FILLER LID LOCK ACTUATOR MANUAL RELEASE PROCEDURE]. (See
FUEL-FILLER LID LOCK ACTUATOR MANUAL RELEASE PROCEDURE.)
5. Disconnect the negative battery terminal. (See NEGATIVE BATTERY TERMINAL DISCONNECTION/CONNECTION.)
6. Remove the following parts:
- (1) Rear tire (LH) (See WHEEL AND TIRE REMOVAL/INSTALLATION.)
-
- (2) Rear mudguard (LH) (See MUDGUARD REMOVAL/INSTALLATION.)
-
- (3) Fuel-filler pipe (See FUEL-FILLER PIPE REMOVAL/INSTALLATION [SKYACTIV-G 2.0].)
-
- (4) Rear package tray (See REAR PACKAGE TRAY REMOVAL/INSTALLATION.)
-
- (5) Trunk covering (See TRUNK COVERING REMOVAL/INSTALLATION.)
-
- (6) Trunk board (See TRUNK BOARD REMOVAL/INSTALLATION.)
-
- (7) Trunk end trim (See TRUNK END TRIM REMOVAL/INSTALLATION.)
-
- (8) Trunk side upper trim (LH) (See TRUNK SIDE UPPER TRIM REMOVAL/INSTALLATION.)
-
7. Partially peel back the trunk side trim (LH) to the position allowing removal of the fuel-filler lid lock actuator. (See TRUNK SIDE TRIM REMOVAL/INSTALLATION.)
8. Remove the trunk side insulator (LH). (See TRUNK SIDE INSULATOR REMOVAL/INSTALLATION.)
9. Remove the fuel-filler lid box. (See FUEL-FILLER LID LOCK ACTUATOR REMOVAL/INSTALLATION.)
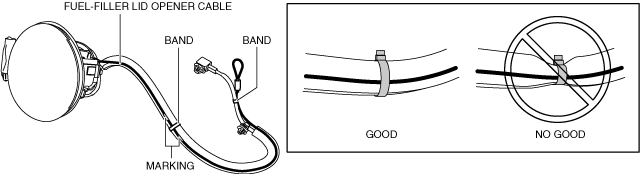
10. Cut the bands. (See Band Assembly Note.)
11. Disconnect the fuel-filler lid opener cable.
12. Install in the reverse order of removal.
13. Complete the [AFTER SERVICE PRECAUTION]. (See AFTER SERVICE PRECAUTION [SKYACTIV-G 2.0].)
Band Assembly Note
-
Caution
-
• If the bands are assembled too tightly, the fuel-filler lid opener cable may not operate. When assembling the bands, allow some clearance for the fuel-filler lid opener cable to operate.
1. Assemble the bands.
2. Verify the operation of the fuel-filler lid opener cable.