 |
a30zzw00002664
ELECTRICAL SUPPLY UNIT (ESU) BRACKET REMOVAL/INSTALLATION
id094000700400
1. Disconnect the negative battery terminal. (See NEGATIVE BATTERY TERMINAL DISCONNECTION/CONNECTION.)
2. Remove the following parts.
3. Partially peel back the trunk side trim (LH) to a position where the electrical supply unit (ESU) can be removed. (See TRUNK SIDE TRIM REMOVAL/INSTALLATION.)
4. Remove the electrical supply unit (ESU). (See ELECTRICAL SUPPLY UNIT (ESU) REMOVAL/INSTALLATION.)
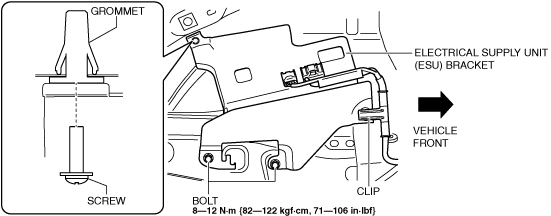
5. Remove the clip.
a30zzw00002664
|
6. Remove the bolts.
7. Remove the screw.
8. Remove the guide of the electrical supply unit (ESU) bracket from the body.
9. Remove the grommet from the body.
10. Remove the electrical supply unit (ESU).
11. Install in the reverse order of removal.