 |
amxzzw00001970
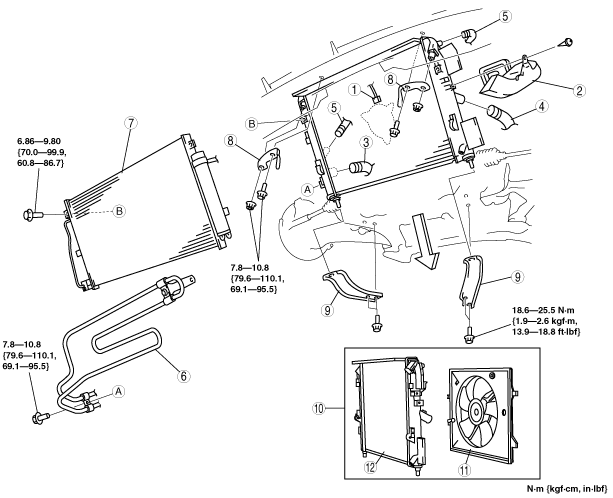
RADIATOR REMOVAL/INSTALLATION [L8, LF]
id0112b4801400
1. Remove the front under cover. (See FRONT UNDER COVER REMOVAL/INSTALLATION.)
2. Drain the engine coolant. (See ENGINE COOLANT REPLACEMENT [L8, LF].)
3. Remove the battery, battery tray, and battery duct. (See BATTERY REMOVAL/INSTALLATION [L8, LF].)
4. Remove the air cleaner. (See INTAKE-AIR SYSTEM REMOVAL/INSTALLATION [L8, LF].)
5. Remove the PCM component (PCM, PCM cover, and PCM bracket) with the PCM connector still connected. Position the PCM component out of the way. (U.K. specs.) (See PCM REMOVAL/INSTALLATION [L8, LF].)
6. Remove the PCM. (Except for U.K. specs.) (See PCM REMOVAL/INSTALLATION [L8, LF].)
7. Remove the air cleaner insulator. (See PCM REMOVAL/INSTALLATION [L8, LF].)
8. Remove the coolant reserve tank. (See COOLANT RESERVE TANK REMOVAL/INSTALLATION [L8, LF].)
9. Disconnect the ATF oil cooler hose from the radiator. (AT)
10. Remove in the order indicated in the table.
11. Install in the reverse order of removal.
12. Refill the engine coolant. (See ENGINE COOLANT REPLACEMENT [L8, LF].)
13. Inspect for engine coolant leakage. (See ENGINE COOLANT LEAKAGE INSPECTION [L8, LF].)
14. Inspect the ATF level. (AT) (See AUTOMATIC TRANSMISSION FLUID (ATF) INSPECTION [SJ6A-EL].)
amxzzw00001970
|
|
1
|
Cooling fan motor connector
|
|
2
|
PCM duct
|
|
3
|
Radiator lower hose
|
|
4
|
Radiator upper hose
|
|
5
|
Coolant reserve tank hose
|
|
6
|
P/S cooling pipe
|
|
7
|
Condenser
(See Condenser Removal Note.)
|
|
8
|
Upper mount rubber bracket
|
|
9
|
Lower mount rubber bracket
|
|
10
|
Radiator and cooling fan component
|
|
11
|
Cooling fan component
|
|
12
|
Radiator
|
P/S Cooling Pipe Removal Note
1. Remove the P/S cooling pipe with the hoses still connected.
Condenser Removal Note
1. Remove the condenser with the cooler pipes still connected.