|
amxuuw00004260
COOLING FAN MOTOR REMOVAL/INSTALLATION [SKYACTIV-G 1.5, SKYACTIV-G 2.0]
id0112i1801900
1. Disconnect the negative battery cable. (See NEGATIVE BATTERY TERMINAL DISCONNECTION/CONNECTION.)
2. Remove the battery and battery tray. (See BATTERY REMOVAL/INSTALLATION [SKYACTIV-G 1.5, SKYACTIV-G 2.0].)
3. Remove the air cleaner, air hose and resonance chamber No.1 as a single unit. (See INTAKE-AIR SYSTEM REMOVAL/INSTALLATION [SKYACTIV-G 1.5, SKYACTIV-G 2.0].)
4. Remove the coolant reserve tank. (See COOLANT RESERVE TANK REMOVAL/INSTALLATION [SKYACTIV-G 1.5, SKYACTIV-G 2.0].)
5. Remove in the order indicated in the table.
6. Install in the reverse order of removal.
amxuuw00004260
|
|
1
|
Fan control module
|
|
2
|
Cooling fan component
|
|
3
|
Cooling fan
(See Cooling Fan Removal Note.)
|
|
4
|
Cooling fan motor
|
|
5
|
Radiator cowling
|
Fan Control Module Removal Note
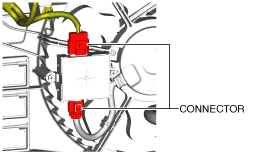
1. Disconnect the fan control module connectors.
amxuuw00004261
|
2. Remove the fan control module.
Cooling Fan Component Removal Note
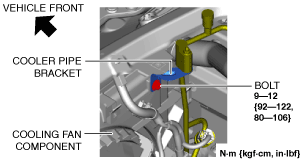
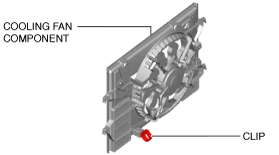
1. Remove the bolt shown in the figure.
amxuuw00004262
|
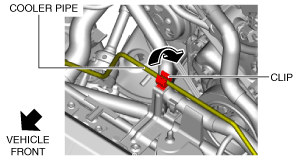
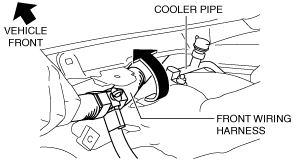
2. Remove the cooler pipe from the clip and set it aside at the vehicle rear.
amxuuw00004263
|
3. Set the washer tank aside with the hose connected so that it does not interfere with the servicing. (See WASHER TANK REMOVAL/INSTALLATION.)
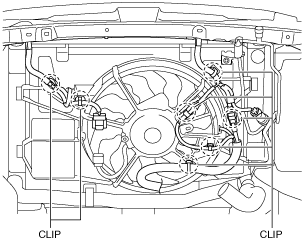
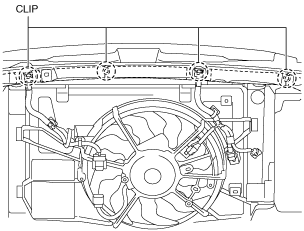
4. Remove the wiring harness clips from the cooling fan component.
amxzzw00002972
|
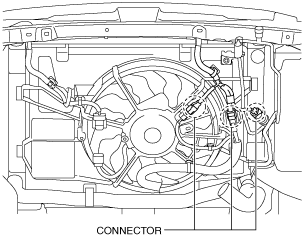
5. Disconnect the connectors shown in the figure.
amxzzw00002973
|
6. Detach the clip and set the lower radiator hose aside.
amxuuw00004266
|
7. Remove the front wiring harness clips passing through the inner side of the shroud panel.
amxuuw00004267
|
8. Pull the front wiring harness toward the upper side of the shroud panel while setting the cooler pipe aside.
amxuuw00004268
|
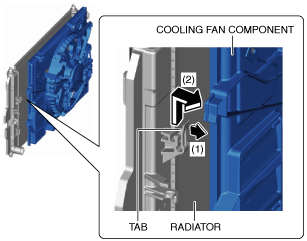
9. While pressing the radiator tabs in the direction of arrow (1) shown in the figure, lift up the cooling fan component in the direction of arrow (2) and remove it from the radiator.
amxuuw00004269
|
amxuuw00004270
|
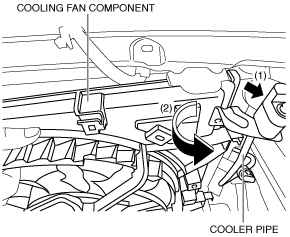
10. Move the cooling fan component until it contacts the vehicle left side.
11. While setting the cooler pipe aside in the direction of arrow (1) shown in the figure, move the cooling fan component in the direction of arrow (2).
amxuuw00004271
|
12. Remove the cooling fan component from the vehicle.
amxuuw00004272
|
Cooling Fan Removal Note
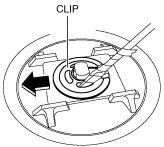
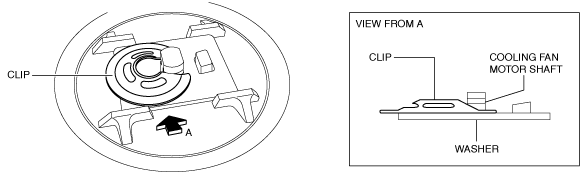
1. Using a flathead screwdriver wrapped in a cloth, slide the clip in the direction of the arrow shown in the figure and remove the clip.
am3uuw00011923
|
2. Remove the washer.
3. Remove the cooling fan.
Cooling Fan Installation Note
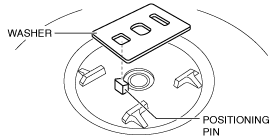
1. Install the washer to the cooling fan.
am3uuw00011924
|
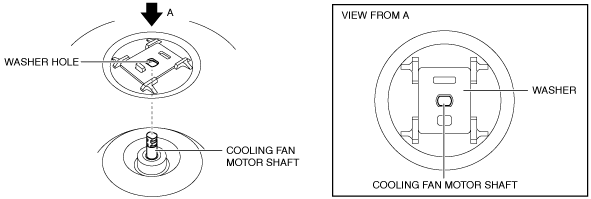
2. Install the cooling fan and the washer to the cooling fan motor as a single unit.
am3uuw00011925
|
am3uuw00011926
|
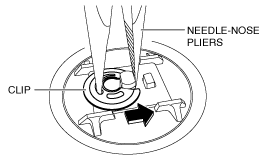
3. Using needle-nose pliers, slide the clip in the direction of the arrow shown in the figure and install the clip.
am3uuw00011927
|
Cooling Fan Component Installation Note
amxuuw00004273
|