DOOR LATCH SWITCH INSPECTION
id091400009500
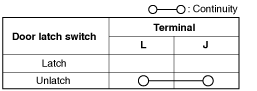
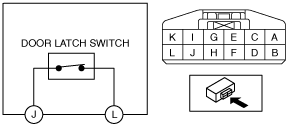
LH
1. Fully close the door glass.
2. Disconnect the negative battery terminal. (See NEGATIVE BATTERY TERMINAL DISCONNECTION/CONNECTION.)
3. Remove the following parts:
- (1) Door trim (See DOOR TRIM REMOVAL/INSTALLATION.)
-
- (2) Door module panel (See DOOR MODULE PANEL REMOVAL/INSTALLATION.)
-
- (3) Door key cylinder (See DOOR KEY CYLINDER REMOVAL/INSTALLATION.)
-
- (4) Inner handle (See INNER HANDLE REMOVAL/INSTALLATION.)
-
- (5) Door latch and lock actuator (See DOOR LATCH AND LOCK ACTUATOR REMOVAL/INSTALLATION.)
-
4. Verify that the continuity is as indicated in the table.
-
Note
-
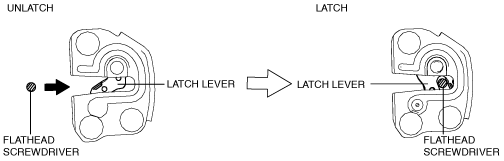
• When inspecting the latch side of the door latch switch, press in the latch lever using a flathead screwdriver and set it to the latched position.
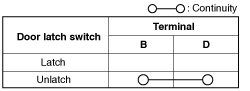
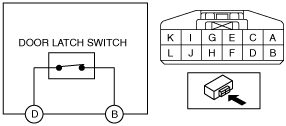
RH
1. Fully close the door glass.
2. Disconnect the negative battery terminal. (See NEGATIVE BATTERY TERMINAL DISCONNECTION/CONNECTION.)
3. Remove the following parts:
- (1) Door trim (See DOOR TRIM REMOVAL/INSTALLATION.)
-
- (2) Door module panel (See DOOR MODULE PANEL REMOVAL/INSTALLATION.)
-
- (3) Inner handle (See INNER HANDLE REMOVAL/INSTALLATION.)
-
- (4) Door latch and lock actuator (See DOOR LATCH AND LOCK ACTUATOR REMOVAL/INSTALLATION.)
-
4. Verify that the continuity is as indicated in the table.
-
Note
-
• When inspecting the latch side of the door latch switch, press in the latch lever using a flathead screwdriver and set it to the latched position.