 |
amxuuw00004254
RADIATOR REMOVAL/INSTALLATION [SKYACTIV-G 1.5, SKYACTIV-G 2.0]
id0112i1801400
1. Disconnect the negative battery cable. (See NEGATIVE BATTERY CABLE DISCONNECTION/CONNECTION.)
2. Remove the battery and battery tray. (See BATTERY REMOVAL/INSTALLATION [SKYACTIV-G 1.5, SKYACTIV-G 2.0].)
3. Remove the air cleaner, air hose and resonance chamber No.1 as a single unit. (See INTAKE-AIR SYSTEM REMOVAL/INSTALLATION [SKYACTIV-G 1.5, SKYACTIV-G 2.0].)
4. Remove the front crossmember under cover. (See FRONT CROSSMEMBER UNDER COVER REMOVAL/INSTALLATION.)
5. Drain the engine coolant. (See ENGINE COOLANT REPLACEMENT [SKYACTIV-G 1.5, SKYACTIV-G 2.0].)
6. Remove the coolant reserve tank. (See COOLANT RESERVE TANK REMOVAL/INSTALLATION [SKYACTIV-G 1.5, SKYACTIV-G 2.0].)
7. Remove the cooling fan component. (See COOLING FAN MOTOR REMOVAL/INSTALLATION [SKYACTIV-G 1.5, SKYACTIV-G 2.0].)
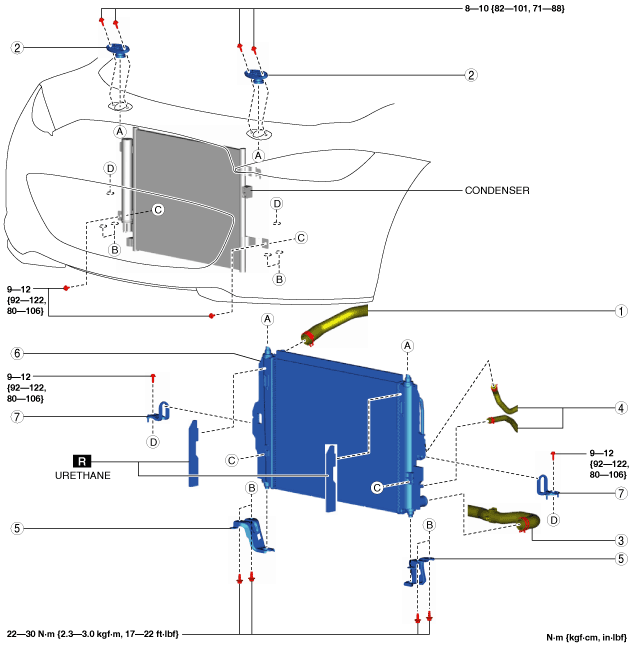
8. Remove in the order indicated in the table.
9. Install in the reverse order of removal.
10. Refill the engine coolant. (See ENGINE COOLANT REPLACEMENT [SKYACTIV-G 1.5, SKYACTIV-G 2.0].)
11. Inspect for engine coolant leakage. (See ENGINE COOLANT LEAKAGE INSPECTION [SKYACTIV-G 1.5, SKYACTIV-G 2.0].)
12. Inspect the ATF level. (See AUTOMATIC TRANSMISSION FLUID (ATF) LEVEL ADJUSTMENT [SJ6A-EL].)
amxuuw00004254
|
|
1
|
Upper radiator hose
|
|
2
|
Upper mount rubber bracket
|
|
3
|
Lower radiator hose
|
|
4
|
Oil hose (AT)
(See Oil Hose Disconnecting Note.)
|
|
5
|
Lower mount rubber bracket
|
|
6
|
Radiator
(See Radiator Removal Note.)
(See Radiator Installation Note.)
|
|
7
|
Center mount rubber bracket
|
Oil Hose Disconnecting Note
1. Place a container under the vehicle to collect drained ATF.
2. Disconnect the oil hoses from the radiator.
3. Secure the oil hoses using rope or equivalent with the hose ends facing upward so that ATF does not drain.
Lower Mount Rubber Bracket Removal/Installation Note
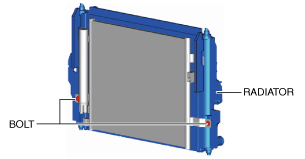
Radiator Removal Note
1. Remove the bolts shown in the figure.
amxuuw00004256
|
amxuuw00004257
|
2. Remove the radiator.
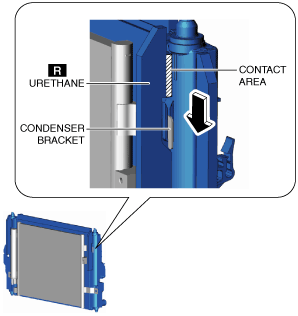
3. If the radiator is to be reused, perform the following procedure:
Center Mount Rubber Bracket Removal Note
1. Remove the front mudguard No.1. (See FRONT MUDGUARD REMOVAL/INSTALLATION.)
2. Remove the front splash shield No.2. (See FRONT SPLASH SHIELD No.2 REMOVAL/INSTALLATION.)
3. Remove the center mount rubber bracket.
Radiator Installation Note
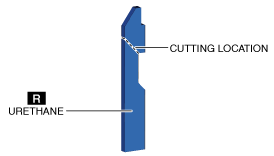
1. Cut new urethane at the location shown in the figure.
amxuuw00004258
|
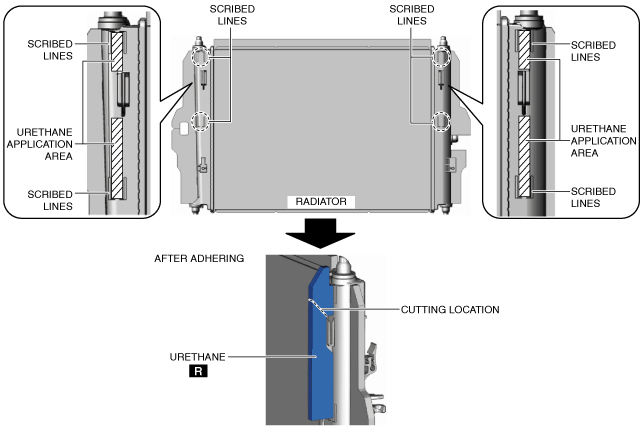
2. Install new urethane to the position (shaded area) shown in the figure.
amxuuw00004259
|
3. Press the urethane with your fingers so that it does not peel off or float.
4. Set the radiator to the installation position.
5. Tighten the bolts shown in the figure.
amxuuw00004256
|
6. Verify that the urethane is correctly installed.