GENERATOR REMOVAL/INSTALLATION [WITHOUT i-ELOOP (SKYACTIV-G 1.5, SKYACTIV-G 2.0)]
id0117008002t0
-
Warning
-
• Remove and install all parts when the engine is cold, otherwise they can cause severe burns or serious injury.
• When the battery cables are connected, touching the vehicle body with generator terminal B will generate sparks. This can cause personal injury, fire, and damage to the electrical components. Always disconnect the negative battery cable before performing the following operation.
-
Note
-
1. Disconnect the negative battery cable. (See NEGATIVE BATTERY CABLE DISCONNECTION/CONNECTION.)
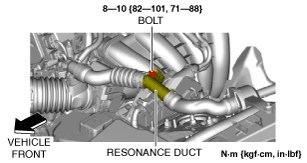
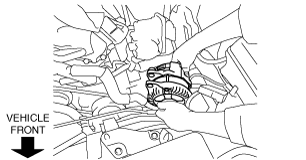
2. Set the resonance duct and air intake hoses No.1 and 2 aside as a single unit using the following procedure. (With resonance chamber No.2)
- (1) Remove the bolt shown in the figure.
-
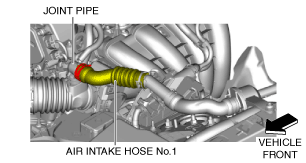
- (2) Disconnect the air intake hose No.1 from the joint pipe.
-
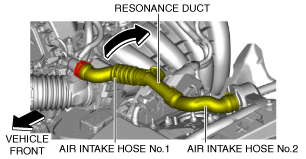
- (3) Set the resonance duct and air intake hoses No.1 and 2 aside as a single unit in the direction of the arrow shown in the figure.
-
3. Remove the battery and battery tray. (See BATTERY REMOVAL/INSTALLATION [SKYACTIV-G 1.5, SKYACTIV-G 2.0].)
4. Remove the air cleaner, air hose and resonance chamber No.1 as a single unit. (See INTAKE-AIR SYSTEM REMOVAL/INSTALLATION [SKYACTIV-G 1.5, SKYACTIV-G 2.0].)
5. Remove the generator drive belt. (See DRIVE BELT REMOVAL/INSTALLATION [SKYACTIV-G 1.5, SKYACTIV-G 2.0].)
6. Remove the drive belt auto tensioner. (See DRIVE BELT AUTO TENSIONER REMOVAL/INSTALLATION [SKYACTIV-G 1.5, SKYACTIV-G 2.0].)
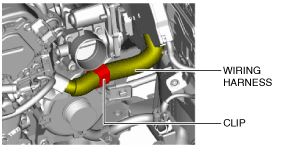
7. Detach the clip and set the wiring harness aside.
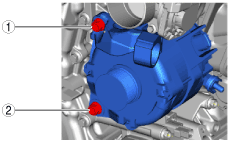
8. Remove the bolt and nuts shown in the figure.
-
Note
-
• The PCM component can be moved freely with the PCM connector connected by removing the nuts and bolt.
Example of PCM component movement
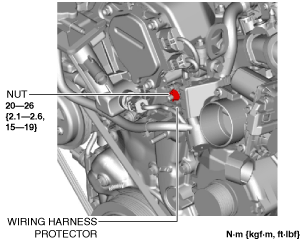
9. Remove the nut shown in the figure.
-
Note
-
• If the nut is removed, the wiring harness protector can be slightly moved.
10. Remove in the order indicated in the table.
11. Install in the reverse order of removal.
|
1
|
Terminal B cable
|
|
2
|
Generator connector
|
|
3
|
Generator
|
Generator Removal Note
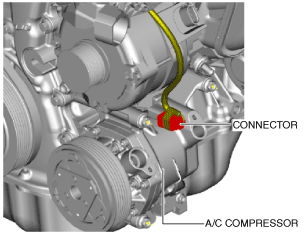
1. Disconnect the A/C compressor connector.
2. Remove the generator upper bolt.
3. Remove the wiring harness bracket.
4. Remove the generator lower bolt.
5. Remove the generator.
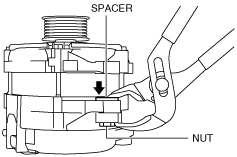
Generator Installation Note
1. To facilitate the installation of the generator to the engine, grasp the spacer in the bolt installation hole using pliers and push it down to the nut side.
2. Align the generator bolt installation holes on the engine and generator sides.
3. Set the wiring harness bracket to the installation position.
4. Temporarily tighten the generator bolts (upper and lower).
5. Tighten the generator bolts in the order shown in the figure.
-
Tightening torque
-
38—52 N·m {3.9—5.3 kgf·m, 29—38 ft·lbf}
6. Connect the A/C compressor connector.