FRONT CONSOLE REMOVAL/INSTALLATION
id091700601900
1. Disconnect the negative battery cable. (See NEGATIVE BATTERY CABLE DISCONNECTION/CONNECTION.)
2. Remove the following parts:
- (1) Selector lever knob (AT) (See AUTOMATIC TRANSMISSION SHIFT MECHANISM REMOVAL/INSTALLATION.)
- (2) Shift lever knob (MT)
- (3) Shift panel component (See SHIFT PANEL REMOVAL/INSTALLATION.)
- (4) Upper panel (See UPPER PANEL REMOVAL/INSTALLATION.)
- (5) Parking brake lever boot panel (See PARKING BRAKE LEVER BOOT PANEL REMOVAL/INSTALLATION.)
- (6) Rear console (See REAR CONSOLE REMOVAL/INSTALLATION.)
- (7) Front console panel (See FRONT CONSOLE PANEL REMOVAL/INSTALLATION.)
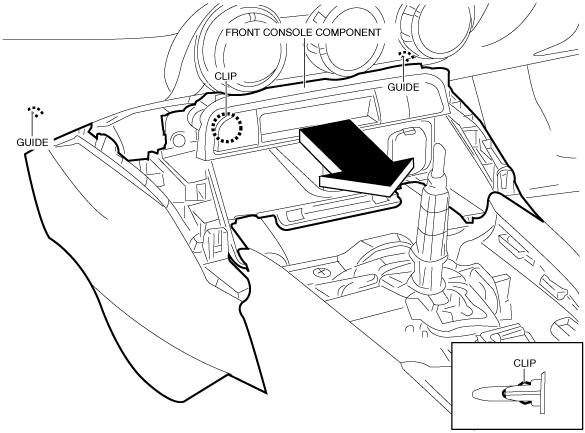
3. Move the front console component in the direction of the arrow shown in the figure and detach the clip from the dashboard.
4. Disconnect the auxiliary jack/USB port connector. (without center display)
5. Disconnect the auxiliary jack/USB port/SD card slot hub connector. (with center display)
6. Disconnect the indicator unit connector.
7. Remove the front console component.
8. When replacing the front console, remove the following parts:
- (1) Side wall (See SIDE WALL REMOVAL/INSTALLATION.)
- (2) Auxiliary jack/USB port (without center display) (See AUXILIARY JACK/USB PORT REMOVAL/INSTALLATION.)
- (3) Auxiliary jack/USB port/SD card slot hub (with center display) (See AUXILIARY JACK/USB PORT/SD CARD SLOT HUB REMOVAL/INSTALLATION.)
- (4) Indicator unit (See INDICATOR UNIT REMOVAL/INSTALLATION.)
9. Install in the reverse order of removal.