VARIABLE INTAKE AIR SHUTTER VALVE ACTUATOR INSPECTION [L8, LF]
id0113a3803000
Operation Inspection
1. Remove the plug hole plate. (See PLUG HOLE PLATE REMOVAL/INSTALLATION [L8, LF].)
2. Remove the following parts:
- (1) Front suspension tower bar (joint), (right side) and (left side) (See FRONT SUSPENSION TOWER BAR REMOVAL/INSTALLATION.)
- (2) Wiper arm and blade (See WIPER ARM AND BLADE REMOVAL/INSTALLATION.)
- (3) Cowl grille (See COWL GRILLE REMOVAL/INSTALLATION.)
- (4) Side cowl grille (See SIDE COWL GRILLE REMOVAL/INSTALLATION.)
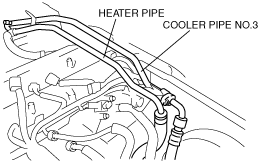
- (5) Move the cooler pipe No.3 and heater pipe slightly out of the way. (L.H.D.)
-
- (6) Service hole cover (See EGR VALVE REMOVAL/INSTALLATION [L8, LF].)
-
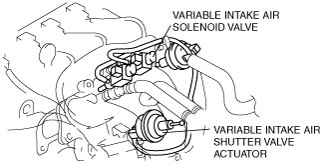
3. Disconnect the vacuum hose from the variable intake air solenoid valve.
4. Connect a vacuum pump to the vacuum hose.
-
Note
-
• Verify that the variable intake air shutter valve actuator rod moves using a mirror.
5. Apply vacuum and verify that the rod moves.
-
• When the variable intake air shutter valve actuator cannot be activated even though the operation of the rod can be confirmed, check for any incorrect connections or brakage of the vacuum hose.
|
Vacuum
kPa {mmHg, inHg}
|
Rod movement
|
|
Below –2.7 {–20, –0.8}
|
Not operate
|
|
Above –33.4 {–251, –9.86}
|
Fully pulled
|