ACTIVE BONNET CONTROL MODULE REMOVAL/INSTALLATION
id081300000800
-
Warning
-
• After the active bonnet has deployed, always newly replace the parts indicated in the active bonnet service warnings in the section dealing with the active bonnet. If the vehicle is driven without part replacement, the active bonnet may not deploy correctly. (See
ACTIVE BONNET SERVICE WARNINGS.)
1. Switch the ignition to LOCK.
2. Remove the battery cover.
3. Disconnect the negative battery cable and wait for 1 min or more. (See BATTERY REMOVAL/INSTALLATION [L8, LF].)
4. Remove the following parts:
- (1) Remove the partition board. (See PARTITION BOARD REMOVAL/INSTALLATION.)
- (2) Trunk end trim (See TRUNK END TRIM REMOVAL/INSTALLATION.)
- (3) Trunk side trim (RH) (See TRUNK SIDE TRIM REMOVAL/INSTALLATION.)
5. Disconnect the active bonnet actuator (RH, LH) connector.
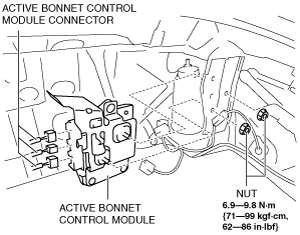
6. Disconnect the active bonnet control module connector.
7. Remove the nuts.
8. Remove the active bonnet control module.
9. Install in the reverse order of removal.
10. Switch the ignition ON.
11. Verify that the active bonnet warning light is illuminated for approx. 6 s and then remains turned off.
-
• If the active bonnet warning light does not operate correctly, refer to the “ON-BOARD DIAGNOSTIC SYSTEM [ACTIVE BONNET]”. (See
FLOWCHART [ACTIVE BONNET].)
-
Note
-
• If the active bonnet warning light is illuminated again after 2 s from being turned off, there is a malfunction in the system.