 |
amxzzw00000987
FRONT BUMPER DISASSEMBLY/ASSEMBLY
id091000405200
Vehicles Without Active Bonnet
Type A (Vehicles with power retractable hardtop)
1. To disassemble the front bumper, remove the following parts:
2. Disassemble in the order indicated in the table.
amxzzw00000987
|
|
1
|
Fastener A
|
|
2
|
Set plate RH
|
|
3
|
Set plate CTR
|
|
4
|
Set plate LH
|
|
5
|
Fastener B
|
|
6
|
Energy absorbing form
|
|
7
|
Front bumper mesh
|
|
8
|
Front fog light bezel
|
|
9
|
Front fog light hole cover (Vehicles without front fog light)
|
|
10
|
Ornament
|
|
11
|
License plate holder
|
|
12
|
Front bumper fascia
|
3. Assemble in the reverse order of disassembly.
Type A (Vehicles without power retractable hardtop)
1. To disassemble the front bumper, remove the following parts:
2. Disassemble in the order indicated in the table.
amxzzw00000988
|
|
1
|
Fastener A
|
|
2
|
Set plate RH
|
|
3
|
Set plate CTR
|
|
4
|
Set plate LH
|
|
5
|
Fastener B
|
|
6
|
Energy absorbing form
|
|
7
|
Front bumper mesh
|
|
8
|
Front fog light bezel
|
|
9
|
Front fog light hole cover (Vehicles without front fog light)
|
|
10
|
Ornament
|
|
11
|
License plate holder
|
|
12
|
Front bumper fascia
|
3. Assemble in the reverse order of disassembly.
Type B
1. To disassemble the front bumper, remove the following parts:
2. Disassemble in the order indicated in the table.
amxzzw00002705
|
|
1
|
Fastener A
|
|
2
|
Set plate RH
|
|
3
|
Set plate CTR
|
|
4
|
Set plate LH
|
|
5
|
Fastener B
|
|
6
|
Energy absorbing form
|
|
7
|
Front bumper mesh
|
|
8
|
Front fog light bezel (Vehicles with front fog light)
|
|
9
|
Front fog light hole cover (Vehicles without front fog light)
|
|
10
|
Nut C
|
|
11
|
Ornament
|
|
12
|
Front bumper fascia
|
3. Assemble in the reverse order of disassembly.
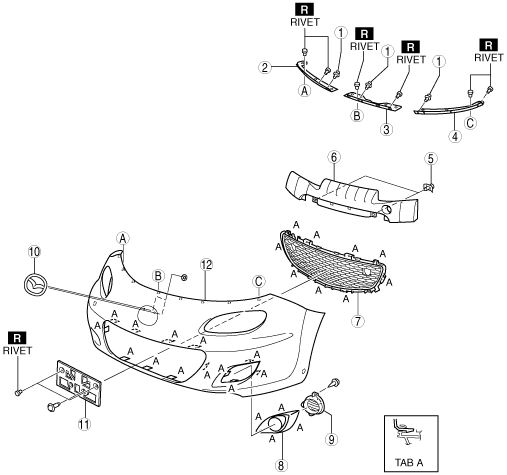
Vehicles With Active Bonnet
1. To disassemble the front bumper, remove the following parts:
2. Disconnect the active bonnet sensor connector. (right, center) (left, center) (See Active Bonnetsensor Connector Disconnect Note.)
amxzzw00002704
|
3. Disassemble in the order indicated in the table.
amxzzw00002707
|
|
1
|
Fastener A
|
|
2
|
Set plate RH
|
|
3
|
Set plate CTR
|
|
4
|
Set plate LH
|
|
5
|
Bolt B
|
|
6
|
Bumper retainer
|
|
7
|
Fastener C
|
|
8
|
Energy absorbing form
|
|
9
|
Front bumper mesh
|
|
10
|
Front fog light bezel (Vehicles with front fog light)
|
|
11
|
Front fog light hole cover (Vehicles without front fog light)
|
|
12
|
Nut D
|
|
13
|
Ornament
|
|
14
|
Front bumper fascia
|
4. Assemble in the reverse order of disassembly.
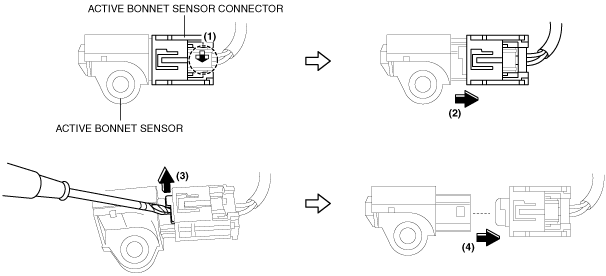
Active Bonnetsensor Connector Disconnect Note
1. Press the location shown by the arrow (1) in the figure and slide the connector in the direction of the arrow (2).
2. Using a flathead screwdriver wrapped in protective tape, lift up the connector in the direction shown by the arrow (3) in the figure and disconnect it in the direction shown by the arrow (4).
amxzzw00002706
|