 |
amxzzw00000931
POWER RETRACTABLE HARDTOP LINK BRACKET REMOVAL/INSTALLATION
id091600810600
1. Remove the following parts:
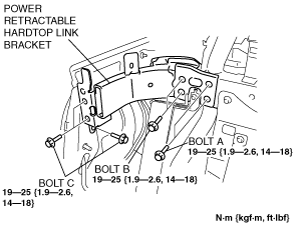
2. Remove the bolts A, B and C. (See Bolt B, C Install Note.)
amxzzw00000931
|
3. Remove the junction. (See SEAT BACK CROSSMEMBER ASSEMBLY REMOVAL/INSTALLATION.)
4. Loosen the installation bolts and nuts of the seat back crossmember component, and tilt the seat back crossmember component towards the vehicle front. (See SEAT BACK CROSSMEMBER ASSEMBLY REMOVAL/INSTALLATION.)
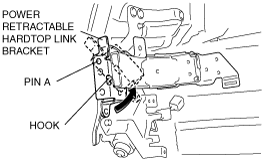
5. Rotate the power retractable hardtop link bracket in the direction shown by the arrow at the pivot fulcrum of pin A and set the hook out of the way.
amxzzw00000932
|
6. Remove the power retractable hardtop link bracket.
7. Install in the reverse order of removal.
Bolt B, C Install Note
1. Temporarily tighten all the bolts, then tighten the bolts in the order indicated in the figure.
amxzzw00000933
|