AUDIO AMPLIFIER REMOVAL/INSTALLATION
id092000801100
Except Power Retractable Hardtop
1. Remove the battery cover.
2. Disconnect the negative battery cable. (See BATTERY REMOVAL/INSTALLATION [L8, LF].)
3. Remove the following parts:
- (1) Console (See CONSOLE REMOVAL/INSTALLATION.)
- (2) Quarter trim (See QUARTER TRIM REMOVAL/INSTALLATION.)
- (3) Scuff plate (SCUFF PLATE REMOVAL/INSTALLATION.)
- (4) Tire house trim (See TIRE HOUSE TRIM REMOVAL/INSTALLATION.)
- (5) Aeroboard (See AEROBOARD REMOVAL/INSTALLATION.)
- (6) Front seat back bar garnish (See SEAT BACK BAR GARNISH REMOVAL/INSTALLATION.)
- (7) Back trim (See BACK TRIM REMOVAL/INSTALLATION.)
- (8) Seat belt set plate (See SEAT BELT REMOVAL/INSTALLATION.)
- (9) Seat back crossmember assembly (See SEAT BACK CROSSMEMBER ASSEMBLY REMOVAL/INSTALLATION.)
- (10) Rear side trim (See REAR SIDE TRIM REMOVAL/INSTALLATION.)
- (11) Rear package trim (See REAR PACKAGE TRIM REMOVAL/INSTALLATION.)
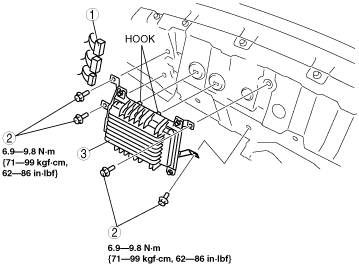
4. Remove in the order indicated in the table.
|
1
|
Connector
|
|
2
|
Bolt
|
|
3
|
Audio amplifier
|
5. Install in the reverse order of removal.
Power Retractable Hardtop
-
Caution
-
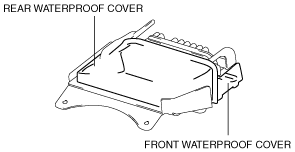
• When removing/installing or transporting the audio amplifier, hold it by its front waterproof cover. Otherwise the waterproof cover could deform and water penetration could cause the audio amplifier to malfunction.
• Always keep the front waterproof cover for the audio amplifier as the bottom surface when storing the audio amplifier. Otherwise the waterproof cover could deform and water penetration could cause the audio amplifier to malfunction.
1. Remove the battery cover.
2. Disconnect the negative battery cable. (See BATTERY REMOVAL/INSTALLATION [L8, LF].)
3. Remove the following parts:
- (1) Console (See CONSOLE REMOVAL/INSTALLATION.)
- (2) Quarter trim (See QUARTER TRIM REMOVAL/INSTALLATION.)
- (3) Scuff plate (See SCUFF PLATE REMOVAL/INSTALLATION.)
- (4) Tire house trim (See TIRE HOUSE TRIM REMOVAL/INSTALLATION.)
- (5) Aeroboard (See AEROBOARD REMOVAL/INSTALLATION.)
- (6) Front seat back bar garnish (See SEAT BACK BAR GARNISH REMOVAL/INSTALLATION.)
- (7) Back trim (See BACK TRIM REMOVAL/INSTALLATION.)
4. Remove in the order indicated in the table.
|
1
|
Connector
|
|
2
|
Nut
|
|
3
|
Audio amplifier
|
5. Install in the reverse order of removal.