 |
am2zzw00004889
OIL SEAL REPLACEMENT [FN4A-EL]
id051701804400
1. Drain the ATF into a separate suitable container. (See AUTOMATIC TRANSAXLE FLUID (ATF) REPLACEMENT [FN4A-EL].)
2. Remove the drive shaft and/or joint shaft. (See DRIVE SHAFT REMOVAL/INSTALLATION [ZJ, ZY].) (See JOINT SHAFT REMOVAL/INSTALLATION [ZJ, ZY].)
3. Remove the oil seal using a flathead screwdriver.
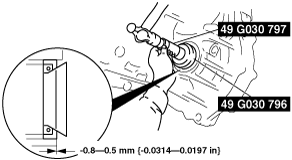
4. Using the SST and a hammer, tap a new oil seal in evenly until the SST contacts the transaxle case.
am2zzw00004889
|
5. Coat the lip of the oil seal with ATF.
6. Install the drive shaft and/or joint shaft. (See DRIVE SHAFT REMOVAL/INSTALLATION [ZJ, ZY].) (See JOINT SHAFT REMOVAL/INSTALLATION [ZJ, ZY].)
7. Add the ATF. (See AUTOMATIC TRANSAXLE FLUID (ATF) REPLACEMENT [FN4A-EL].)
8. Perform the “Mechanical System Test“. (See MECHANICAL SYSTEM TEST [FN4A-EL].)