SIDE PANEL REMOVAL/INSTALLATION
id091700454000
1. Partially peel back the seaming welt.
2. Remove the following parts:
- (1) Front scuff plate (See FRONT SCUFF PLATE REMOVAL/INSTALLATION.) (See FRONT SCUFF PLATE REMOVAL/INSTALLATION [3HB].)
- (2) Front side trim (See FRONT SIDE TRIM REMOVAL/INSTALLATION.) (See FRONT SIDE TRIM REMOVAL/INSTALLATION [3HB].)
- (3) Shift lever knob (MTX) (See MANUAL TRANSAXLE SHIFT MECHANISM REMOVAL/INSTALLATION [F35M-R].) (See MANUAL TRANSAXLE SHIFT MECHANISM REMOVAL/INSTALLATION [B65M-R].)
- (4) Side wall (See SIDE WALL REMOVAL/INSTALLATION.)
- (5) Front console component (See FRONT CONSOLE COMPONENT REMOVAL/INSTALLATION.)
- (6) Bonnet release lever (See BONNET LATCH AND RELEASE LEVER REMOVAL/INSTALLATION.)
- (7) Lower panel (See LOWER PANEL REMOVAL/INSTALLATION)
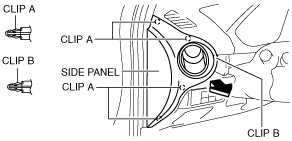
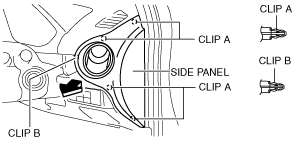
3. Pull the side panel in the direction of the arrow shown in the figure and remove it while detaching clips A and B.
L.H.D.
R.H.D.
4. Install in the reverse order of removal.