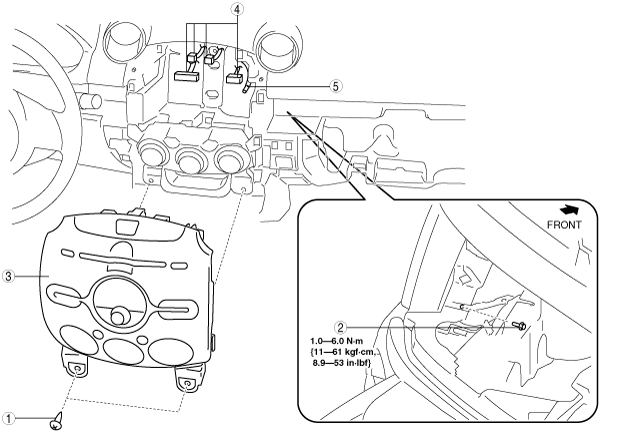
CENTER PANEL UNIT REMOVAL/INSTALLATION
id092000800600
-
Note
-
• The type of center panel unit varies depending on the manufacture period of the vehicle. Verify the type of center panel unit before removing the center panel unit.
1. Disconnect the negative battery cable.
2. Remove the following parts:
- (1) Shift lever knob (MTX) (See MANUAL TRANSAXLE SHIFT MECHANISM REMOVAL/INSTALLATION [F35M-R].) (See MANUAL TRANSAXLE SHIFT MECHANISM REMOVAL/INSTALLATION [B65M-R].)
- (2) Side wall (See SIDE WALL REMOVAL/INSTALLATION.)
- (3) Front console component (See FRONT CONSOLE COMPONENT REMOVAL/INSTALLATION.)
- (4) Glove compartment (See GLOVE COMPARTMENT REMOVAL/INSTALLATION.)
3. Remove in the order indicated in the table.
4. Install in the reverse order of removal.
-
Caution
-
• If the wiring harness or the antenna feeder is caught between the center panel unit and dashboard, it could cause a malfunction. When installing the center panel unit, make sure that the wiring harness and antenna feeders are not caught between the center panel unit and dashboard.
Without CD/USB/AUX switch
|
1
|
Screw
|
|
2
|
Bolt
|
|
3
|
Center panel unit
|
|
4
|
Connector
|
|
5
|
Antenna feeder plug
|
With CD/USB/AUX switch
|
1
|
Screw
|
|
2
|
Bolt
|
|
3
|
Center panel unit
|
|
4
|
Connector
|
Center Panel Unit Removal Note
1. Remove the center panel unit tabs A and clips B, C from the dashboard.
Without CD/USB/AUX switch
With CD/USB/AUX switch
-
Caution
-
• When the center panel unit is removed, clips C could interfere with the climate control unit bracket and cause damage. Pull the center panel unit in the direction of the arrow shown in the figure (upward at a
approx. 20°angle) when removing it.
