REAR POWER WINDOW REGULATOR REMOVAL/INSTALLATION
id091200001200
1. Perform the rear door glass preparation. (See REAR DOOR GLASS REMOVAL/INSTALLATION.)
-
Note
-
• Before removing the rear door glass, the removal procedure for the rear door glass installation bolt can be facilitated by adjusting the top of the rear door glass to the position approx. 70 mm {2.8 in} away from the upper part of the rear beltline molding.
2. Disconnect the negative battery cable. (See NEGATIVE BATTERY CABLE DISCONNECTION/CONNECTION.)
3. Remove the following parts:
- (1) Power window subswitch (rear-side) (See POWER WINDOW SUBSWITCH REMOVAL/INSTALLATION.)
- (2) Rear door trim (See REAR DOOR TRIM REMOVAL/INSTALLATION.)
- (3) Rear door speaker (See REAR DOOR SPEAKER REMOVAL/INSTALLATION.)
- (4) Rear power window motor (See REAR POWER WINDOW MOTOR REMOVAL/INSTALLATION.)
- (5) Rear door glass (See REAR DOOR GLASS REMOVAL/INSTALLATION.)
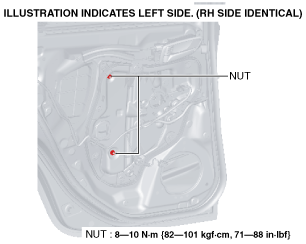
4. Remove the nuts.
5. Insert your hand through the rear door speaker installation hole and support the drum housing.
6. Move the clip tabs in the direction of arrows (1) shown in the figure to detach the tabs, and move the clip in the direction of arrow (2) to remove.
7. Remove the rear power window regulator through the speaker installation hole.
-
Caution
-
• When removing the rear power window regulator, the rear power window regulator may contact the rear door speaker installation hole, and the coating film of the rear door inner panel and the rear power window regulator could be damaged. Remove the rear power window regulator while verifying that the rear power window regulator and the rear door speaker installation hole do not contact each other.
8. Install in the reverse order of removal.
