1. Level the vehicle.
2. Complete the "BEFORE REPAIR PROCEDURE". (See BEFORE SERVICE PRECAUTION [ZY].)
3. Disconnect the negative battery cable.
4. Drain the fuel using the following procedure.
5. Remove the silencer. (See EXHAUST SYSTEM REMOVAL/INSTALLATION [ZY].)
6. Remove the crossmember and the member. (See EXHAUST SYSTEM REMOVAL/INSTALLATION [ZY].)
7. Remove the TWC rubber hangers and lower the TWC to where the insulator can be removed.
8. Remove in the order indicated in the table.
9. Install in the reverse order of removal.
10. Complete the "AFTER REPAIR PROCEDURE". (See AFTER SERVICE PRECAUTION [ZY].)
.
|
1
|
Insulator
|
|
2
|
Fuel hose protector
|
|
3
|
Quick release connector
|
|
4
|
Evaporative hose
|
|
5
|
Joint hose
(See Joint Hose Installation Note.)
|
|
6
|
Breather hose
|
|
7
|
Strap
|
|
8
|
Fuel tank assembly
|
|
9
|
Fuel pump unit
|
|
10
|
Charcoal canister
|
|
11
|
Fuel-filler cap
|
|
12
|
Fuel-filler pipe
|
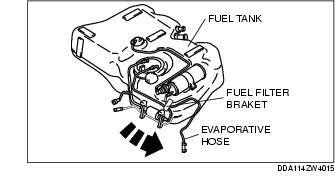
1. Disengage the disconnected evaporative hose from the fuel filter (high-pressure) bracket and set it out of the way as shown in the figure.
1. Carefully lower (30-60mm) the fuel tank component and disconnect the fuel pump unit connector.
1. Set the auto leveling sensor out of the way. (See AUTO LEVELING SENSOR REMOVAL/INSTALLATION.)
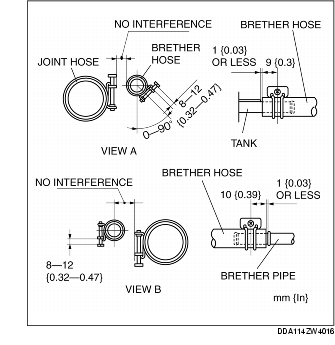
1. Install the breather hose and clamps as shown in the figure.
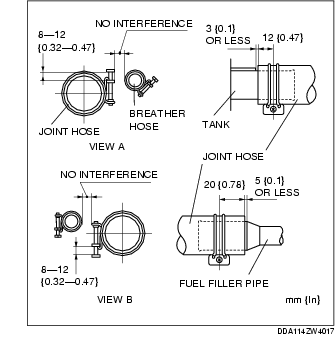
1. Verify that there is no damage to the nonreturn valve built into the fuel-filler pipe.
2. Install the joint hose and clamps as shown in the figure.
1. Push the evaporative hose onto the evaporative pipe unit it reaches the stopper.
2. Assemble the clamp with the tabs pointing sideward.
3. Install the clamp by aligning it with the clamp marks remaining on the hose.