1. Disconnect the negative battery cable.
2. Remove glove compartment No.1. (See GLOVE COMPARTMENT NO.1 REMOVAL/INSTALLATION.)
3. Remove glove compartment No.2. (See GLOVE COMPARTMENT NO.2 REMOVAL/INSTALLATION.)
4. Remove the console. (See CONSOLE REMOVAL/INSTALLATION.)
5. Remove the meter hood. (See METER HOOD REMOVAL/INSTALLATION.)
6. Remove the instrument cluster. (See INSTRUMENT CLUSTER REMOVAL/INSTALLATION.)
7. Remove the column cover. (See COLUMN COVER REMOVAL/INSTALLATION.)
8. Remove the lower panel. (See LOWER PANEL REMOVAL/INSTALLATION.)
9. Remove the steering shaft. (See STEERING WHEEL AND COLUMN REMOVAL/INSTALLATION.)
10. Remove the A-pillar trims. (See A-PILLAR TRIM REMOVAL/INSTALLATION.)
11. Remove the front scuff plates. (See FRONT SCUFF PLATE REMOVAL/INSTALLATION.)
12. Remove the front side trims. (See FRONT SIDE TRIM REMOVAL/INSTALLATION.)
13. Remove the side panels. (See SIDE PANEL REMOVAL/INSTALLATION.)
14. Disconnect the dashboard harness connectors.
15. Remove the driver-side door. (See FRONT DOOR REMOVAL/INSTALLATION.)
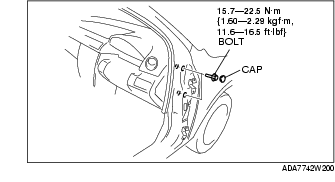
16. Remove the caps and the bolts.
17. Remove the installation nuts for the blower unit and the A/C unit.
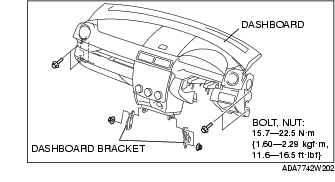
18. Remove the bolts and the nuts.
19. Pull out the support pins from the body, then remove the dashboard.
20. Remove the dashboard through the front driver-side door opening.
21. Install in the reverse order of removal.