 |
am2zzw00001059
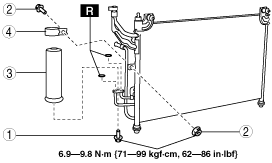
RECEIVER/DRIER REMOVAL/INSTALLATION
id071100801400
1. Disconnect the negative battery cable.
2. Collect the refrigerant. (See REFRIGERANT CHARGING.)
3. Remove the front bumper. (See FRONT BUMPER REMOVAL/INSTALLATION.)
4. Remove the seal board upper. (See SEAL BOAD UPPER REMOVAL/INSTALLATION.)
5. Remove the closing plate. (See SHROUD PANEL REMOVAL/INSTALLATION.)
6. Remove in the order indicated in the table. Do not allow compressor oil to spill.
am2zzw00001059
|
|
1
|
Bolt
(See Bolt Removal Note.)
(See Bolt Installation Note.)
|
|
2
|
Bolt and nut
|
|
3
|
Receiver/drier
|
|
4
|
Bracket
|
7. Install in the reverse order of removal.
8. Perform the refrigerant system performance test. (See REFRIGERANT SYSTEM PERFORMANCE TEST.)
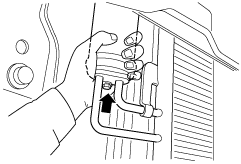
Bolt Removal Note
1. Disconnect the block joint type pipes by grasping female side of the block with hand and holding firmly, then loosen the connection bolt.
adejjw00001532
|
Bolt Installation Note
1. Tighten the bolt of joint by hand.
2. Connect the block joint type pipe by grasping the female side of the block with hand holding firmly, then tighten the connection bolt.
adejjw00001532
|
3. Tighten the joint to the specified torque.