 |
SHROUD PANEL REMOVAL/INSTALLATION
id091000406300
1. Disconnect the negative battery cable.
2. Remove the following parts:
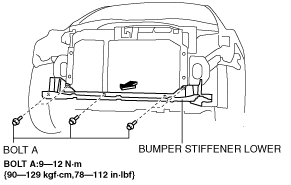
3. Remove bolts A, then remove the bumper stiffener lower in the direction of the arrow shown in the figure.
am2zzw00001619
|
4. Remove fasteners B, then remove the closing plate in the direction of the arrow shown in the figure.
am2zzw00001620
|
5. Remove bolts C, then set the shroud upper plate out of the way.
am2zzw00003376
|
6. Remove the upper mount rubber bracket in the direction of the arrow in the figure, then remove the upper mount rubber. (See Upper Mount Rubber Removal Note)
am2zzw00001622
|
7. Pull the shroud panel in the direction of arrow (1) in the figure, and remove it in the direction of arrow (2).
am2zzw00001623
|
8. Install in the reverse order of removal.
Upper Mount Rubber Removal Note
1. Remove the upper mount rubber bracket while pressing down the upper mount rubber bracket tab in the direction of the arrow in the figure.
am2zzw00001624
|