 |
am2zzw00003847
A/C COMPRESSOR REMOVAL/INSTALLATION [MZ-CD 1.6]
id0711008010k2
1. Disconnect the negative battery cable.
2. Remove the splash shield (RH).
3. Collect the refrigerant. (See REFRIGERANT CHARGING.)
4. Remove the drive belt. (See DRIVE BELT REMOVAL/INSTALLATION [MZ-CD 1.6].)
5. Remove the drive belt cover.
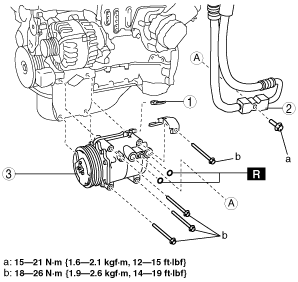
6. Remove in the order indicated in the table. Do not allow remaining compressor oil in the A/C compressor and pipes to spill.
am2zzw00003847
|
|
1
|
Connector
|
|
2
|
Cooler hose
|
|
3
|
A/C compressor
|
7. Install in the reverse order of removal.
8. Perform the refrigerant system performance test. (See REFRIGERANT SYSTEM PERFORMANCE TEST.)
A/C Compressor Installation Note
1. Drain the oil into a clean container while rotating the shaft of the new A/C compressor 6–8 times. This drained oil is to be re-added to the compressor so be careful not to let it become dirty.
am3zzw00000708
|
2. For the old compressor, drain the oil into a separate, clean container while rotating the shaft 6–8 times.
3. Compare the quantities of the two oils. The oil quantity from the new A/C compressor should be more than the that from the old A/C compressor.
4. Adjust the quantity of the oil removed in procedure 1 to the quantity of the oil removed from the old A/C compressor, and then add it to the new A/C compressor.
